Task
First, complete the global declarations and the setup according to the comments in the code.
In this exercise, we’ll build disco lights that flash to the beat of the music. The sound sensor in the Maker Kit can track music, and at the same time, we’ll learn how to flash five leds independently with Arduino.
So far, we’ve timed Arduino by using the delay command. It’s easy to apply, but the problem is that during the delay, Arduino doesn’t do anything else.
What if you want to control several devices at the same time, independent of each other? For smarter time management, there’s a command millis, which keeps track of how long a program has been running on Arduino.
Even small leds have a nice luminosity, but on their own, they’re not that impressive. Watch the video below. In it, the leds are put inside ping pong balls, which make the light scatter more effectively.
In addition to Mehackit-board (or Arduino), USB cable, wires, and breadboard, you’ll need:
| Part | Picture | Description |
|---|---|---|
| Extension wires | 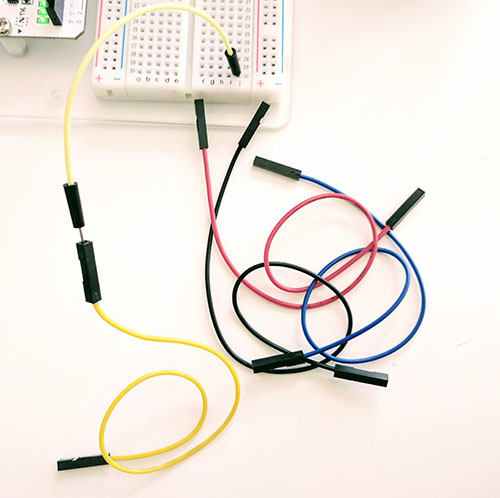 | |
| Led x 5 | LEDs with a blank bulb are the most powerful - choose different colors! | |
| Vastus 330 Ω x 5 |  | The resistor resists the flow of electric current. The value of the resistor is measured in ohms (Ω) and announced in the component in stripes of different colors (in this case orange, orange, brown and gold). |
| Sound sensor | 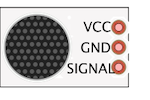 | Simple microphone-module that reacts to sound. |
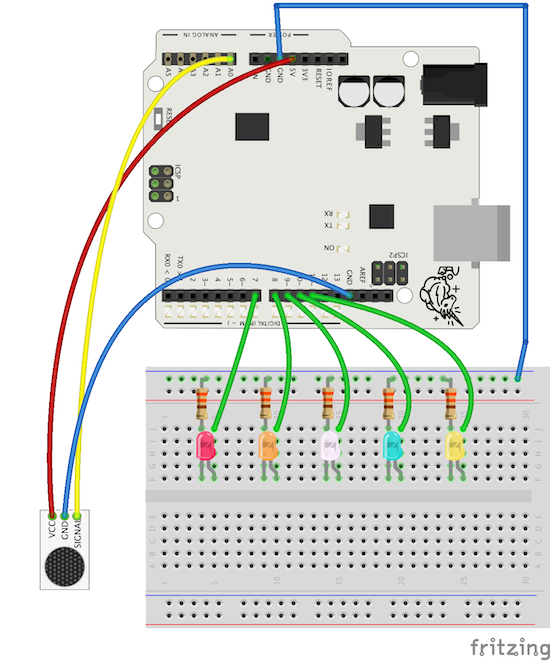
The sound sensor reacts to the amplitude of the sound. The incoming signal is between 0-1023. The range is divided into suitable parts so that each led blinks only during certain amplitudes.
For example, when the reading of the sensor is between:
Each LED is on for a certain amount of time. All LEDs are controlled individually: each of them is constantly ready to turn on, and their function doesn’t depend on whether the other LEDs are on or not.
Familiar commands:
pinMode(pin, mode)digitalWrite(pin, value)delay(time)Serial.begin(speed)Serial.println(print)analogRead(pin)New commands and terms:
millis(): This function clocks time from the start of the program, i.e., returns the number of milliseconds since Arduino began running the current program. Using the millis() function, it’s possible to time simultaneous features.int ledPin1 = 7;
// define int variables based on the example
// ledPin2 - ledPin5
// and as their values, set
// the pins the rest of the LEDs are connected to
void setup() {
pinMode(outPin1, OUTPUT);
// also based on the example, define
// ledPin2-ledPin5
// as outputs
Serial.begin(9600);
}
void loop() {
  // define int variable "sensor", and as its value, read the reading of pin A0
  // add a 8 ms delay
  // print sensor in serial monitor
}
Now that the sensor measures amplitude, based on the data, you can assign each LED its own volume bandwidth, which makes them turn on. With a little adjustment, it’s possible to make one of the LEDs to react to the bass drum, and another to vocals, for example!
void loop() {

  // define int variable "sensor", and as its value, read the reading of pin A0
  // add an 8 ms delay
  // print sensor in serial monitoriin

  if ((sensor > 50) && (sensor < 150)){
    digitalWrite(outPin1, HIGH);
  }
  // Based on the exmple above, write if statements for other LEDs

  delay(10);
  digitalWrite(outPin1, LOW);
  // Based on the example above, program the other LEDs to turn off

}
You’ll note, that the LEDs do react to sound - but only one at a time. This is because of the delay command: during one loop, only one LED is turned on, and it stays on for the whole duration of the delay. Only after this, on a new loop, can the program turn on the next LED.
How can we turn on another LED while another one is still lit? On the next tab, we’ll introduce a new command, millis, that you can use to time simultaneous functions.
Now we’ll resolve the challenge of timing the way the LEDs turn on and off.
unsigned long interval = 200;
unsigned long currentMillis;
unsigned long previousMillis = 0;

int ledPin1 = 7;
// define int variables
// ledPin2 - ledPin5
// and as their values, set
// the pins the rest of the LEDs are connected to
unsigned long variables are extended size variables. Their values can’t be negative.interval: the duration each LED is on at a timecurrentMillis: clocks the time from the start of the program in millisecondspreviousMillis: a variable that stores the elapsed time between 200 millisecondsvoid loop() {
currentMillis = millis();
// define int variable sensor, and as its value, read the reading of pin A0
// add an 8 ms delay
// print sensor in serial monitor
if ((sensor > 50) && (sensor < 150)){
digitalWrite(ledPin1, HIGH);
}
// Based on the example above, write if statements for other LEDs
// delay(10); Comment or edit out this delay
if(currentMillis - previousMillis >= interval) {
previousMillis = currentMillis;
digitalWrite(ledPin1, LOW);
// Based on the example above, program the other LEDs to turn off
}
}
currentMillis = millis(): On each loop, we’ll check how long the program has been running.if(currentMillis - previousMillis >= interval) checks if it’s time to turn off LEDs, i.e., has it been 200 milliseconds from the last time they were turned off. You must place the commands to turn off LEDs inside this statement.It may feel difficult to understand the program at first. It may help to remember that Arduino runs about 500 loops per second and that during each loop, it’s ready to turn one of the LEDs on. However, the LEDs are not turned off during each loop, but between 200 milliseconds. Loop following the turning off of the LED starts so fast that it may seem, that the LED hasn’t been turned off at all.
Fading out the light of the LEDs
Using for-loop you can program a fade in the LEDs, giving the disco lights an analog feeling.
Replacing the LEDs with other devices
digitalWrite-command is not interested in what device is connected to the pin defined in it. The video below was shot in the Mehackit course of Stadin Ammattiopisto. In it, digitalWrite command is used to turn on and off lights of a car. At the end of the video, they use the same program as we did in the disco lights exercise.