Measuring Acceleration

Introduction

The accelerometer is a component which measures the change of speed, i.e., acceleration. The component in the Mehackit Maker Kit measures acceleration in three axes, X, Y, and Z.

You can find an accelerometer in many everyday devices, like new smartphones. In practice, by measuring acceleration, you can determine the position of the device!

In this exercise, you’ll learn more about an accelerometer and produce different sounds using accelerations it detects.

Afrotechmods: How an accelerometer works!

Transcript

Have you ever wondered how your phone manages to know what direction you are holding it? It's using a device called an accelerometer. It works by sensing the acceleration of gravity and then you can calculate what direction the phone is facing. But how does a piece of electronics sense something mechanical like acceleration? The answer is MEMS. Microelectromechanical systems. MEMS are kind of like silicon integrated circuits but they are mechanical in nature. MEMS manufacturers use similar techniques that are used to make electronics but instead they're making tiny mechanical structures that can interface to electronics... allowing you to build some interesting things. Here I've got some MEMS dies that I made out of silicon. They contain a lot of the same basic structures that you might find in a modern MEMS chip. Let's take a look under the microscope. This is a tiny resistor. The lighter colored material is actually electrically conductive silicon and this darker area that's been etched away doesn't conduct. This long winding electrical path forms a resistor, very similar to how long pieces of wire would also have a significant resistance. So if you made an electrical connection between these two points you'd have a microscopic resistor. Now in order to understand how an accelerometer works, let's look at a MEMS capacitor. It doesn't look like a capacitor does it? Well remember that all a capacitor really is is two conductive plates that are electrically separated. Here are the two terminals of the capacitor. Over here we have what's called a combed finger arrangement. The two structures are very close to each other but they aren't quite touching. Let me highlight it for you. Now it should be more obvious that you have parallel surfaces which form a capacitor. But this is no ordinary capacitor! It's a physical structure that can move. This thing over here is basically a tiny weight made out of silicon and it's kind of like a suspended mass on the end of a spring. Movement, vibrations, and even gravity can cause this little mass to move around and when it does it shifts the entire combed finger structure. When the fingers move the distance between the fingers changes. And when the distance between the fingers changes, you get a change in capacitance. So now we have an electromechanical system that can sense movement and turn it into a changing capacitance value. The next step would be to design circuitry that can sense the change in capacitance and convert it into useful voltages or serial data but that's beyond the scope of this tutorial. A modern MEMS accelerometer will contain structures similar to this except with even more fingers to increase the surface area which increases the capacitance which makes changes in acceleration easier to detect. Here's another electromechanical capacitor except it senses acceleration on the horizontal axis. (Ignore this. That will right buff out.) When the suspended mass moves in the horizontal direction, the surface area between the fingers changes and then you can have some electronics to sense the change in capacitance again. Now if you want to play around with accelerometers at home, you don't need a microscope. You can go 
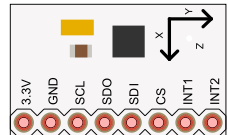
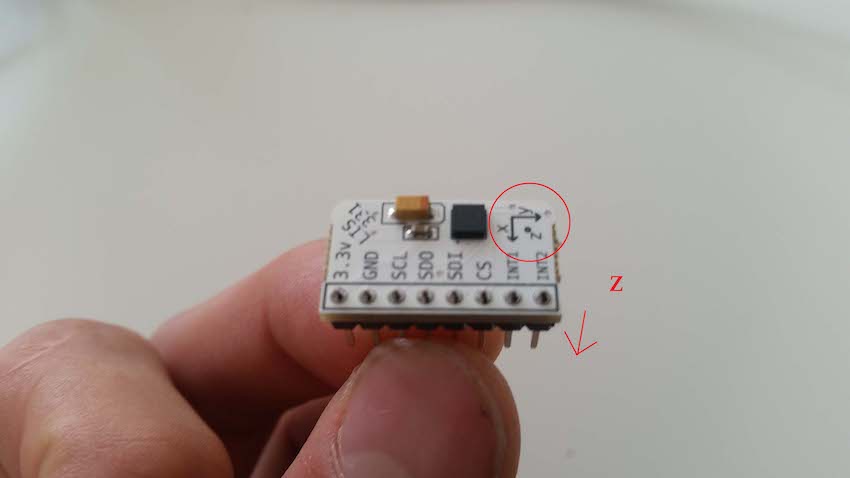
to a company like Adafruit and buy a PCB with an accelerometer chip on it. Just power it with 5 volts between Vin and ground and you'll get voltages that correspond to acceleration on the X, Y and Z axes. Now you know how an accelerometer works thanks for watching!

Parts

In addition to Mehackit board (or Arduino), USB cable, breadboard, and wires, you’ll need:

PartPictureDescription
LIS331 AccelerometerThe accelerometer registers acceleration in X, Y, and Z axes, and you can communicate with it using SPI communication.
Piezo-buzzerPiezo is a simple speaker, with which you can turn changes in voltage to sound. Many Piezos can also be used as sensors.

The Circuit

  • As in the picture, connect the accelerometer to 3,3V voltage, to ground, and to pins 10, 11, 12, and 13. Don’t connect the accelerometer to 5V voltage because it may break it!
  • Connect the Piezo buzzer to a digital pin and to ground.

Programming

You’ll find the program to use the accelerometer here. The program is quite long and a bit complicated. However, by reading the comments written in the program, you’ll get a good picture of how it works.

Do This
Upload the program to Arduino. Open the Serial Monitor. First, turn the accelerator around in its place. Try then waving the sensor with accelerating motions in different directions. What are the biggest values you can get from the sensors in x, y, and z directions? Can you tell, what the unit of the values is?

The values are converted to gravitational acceleration (g = 9,81 m/s^2). For example, the value 2 means two gravitational accelerations. When you hold the sensor in its place, the acceleration directing downward should, in practice, be one gravitational acceleration because of gravity. When the sensor is level, the z-axis points downwards.


Which of the following is the best use for en accelerometer?

Making a Magic Wand

Earlier, you connected the Piezo buzzer. Now, it’s your job to create a program that plays different notes depending on acceleration!

Task
Remove the comment marks ("//") from line 36, where the function magicWand is called. In other words, put the command in line 36 to use! Wave the accelerometer and observe, what kind of sound the Piezo produces.

Task
Edit the magicWand function and see, with what kind of logic can you produce the most interesting sounds. Can you make the Piezo produce a different sound every time the acceleration in x, y, or z direction exceeds the value 2?

Note, that in steady motion the acceleration is 0, so in principle, the Piezo doesn’t make a sound. It’ll only produce sound when the motion is accelerating. However, because gravity produces slight acceleration to the sensor, the Piezo makes a low sound even in “normal state”.

Below is an example of a magic wand! You can make your own or develop the idea further as part of the final project.

Mehackit: Magic wand

Additional information

SPI-communication

You communicate with the accelerometer using the SPI-protocol. Arduino sends eight-bit empty bytes to the accelerometer, which responds by sending bytes back. The bytes sent back by the accelerometer are accelerations that it has detected in x, y, and z directions. Because versatile data is exchanged a lot, communication must be precise and on time. Time is kept track on through the accelerometer’s SCL pin, which was connected to Arduino’s pin 12.

More on SPI communication