Babbling Creature

Educator notes

Educator Intro

This project is a great opportunity to combine handicraft skills with creative coding! It’s advisable that before starting this project, your students and yourself are all ready familiar with the Electronics & Programming Basics. Nevertheless, the difficulty of this project is easy.

Key concepts for this project

  • Implementing ideas into projects
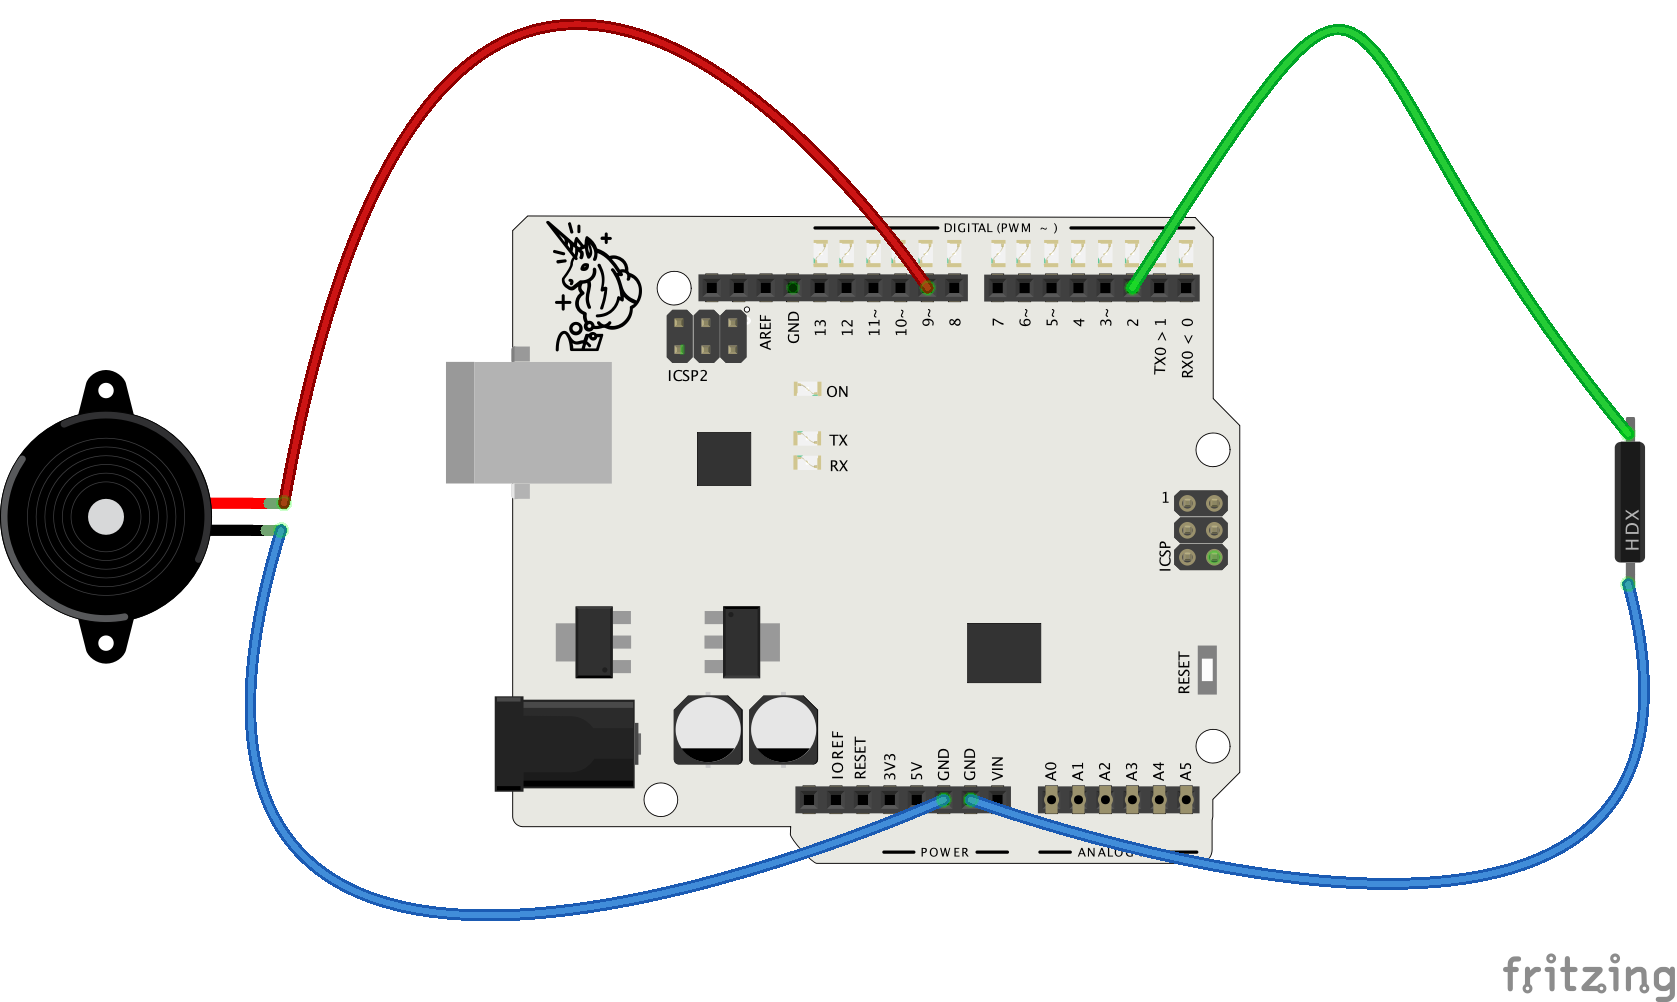
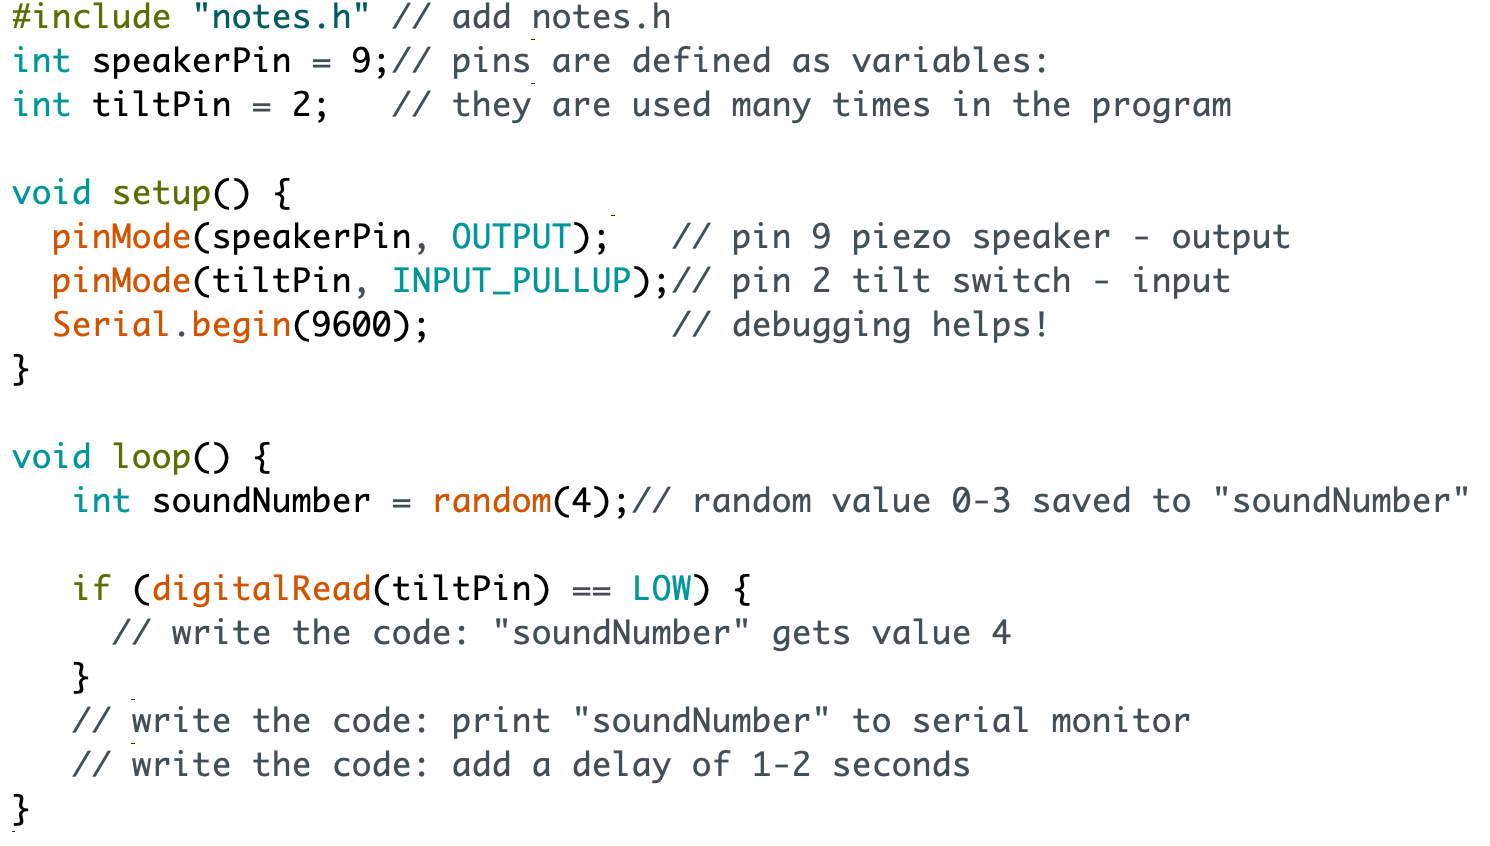
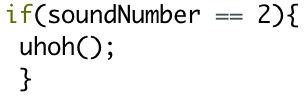
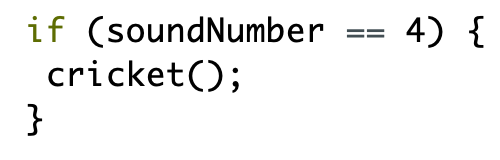
  • Producing sound effects with Arduino
  • Understanding how to define musical notes
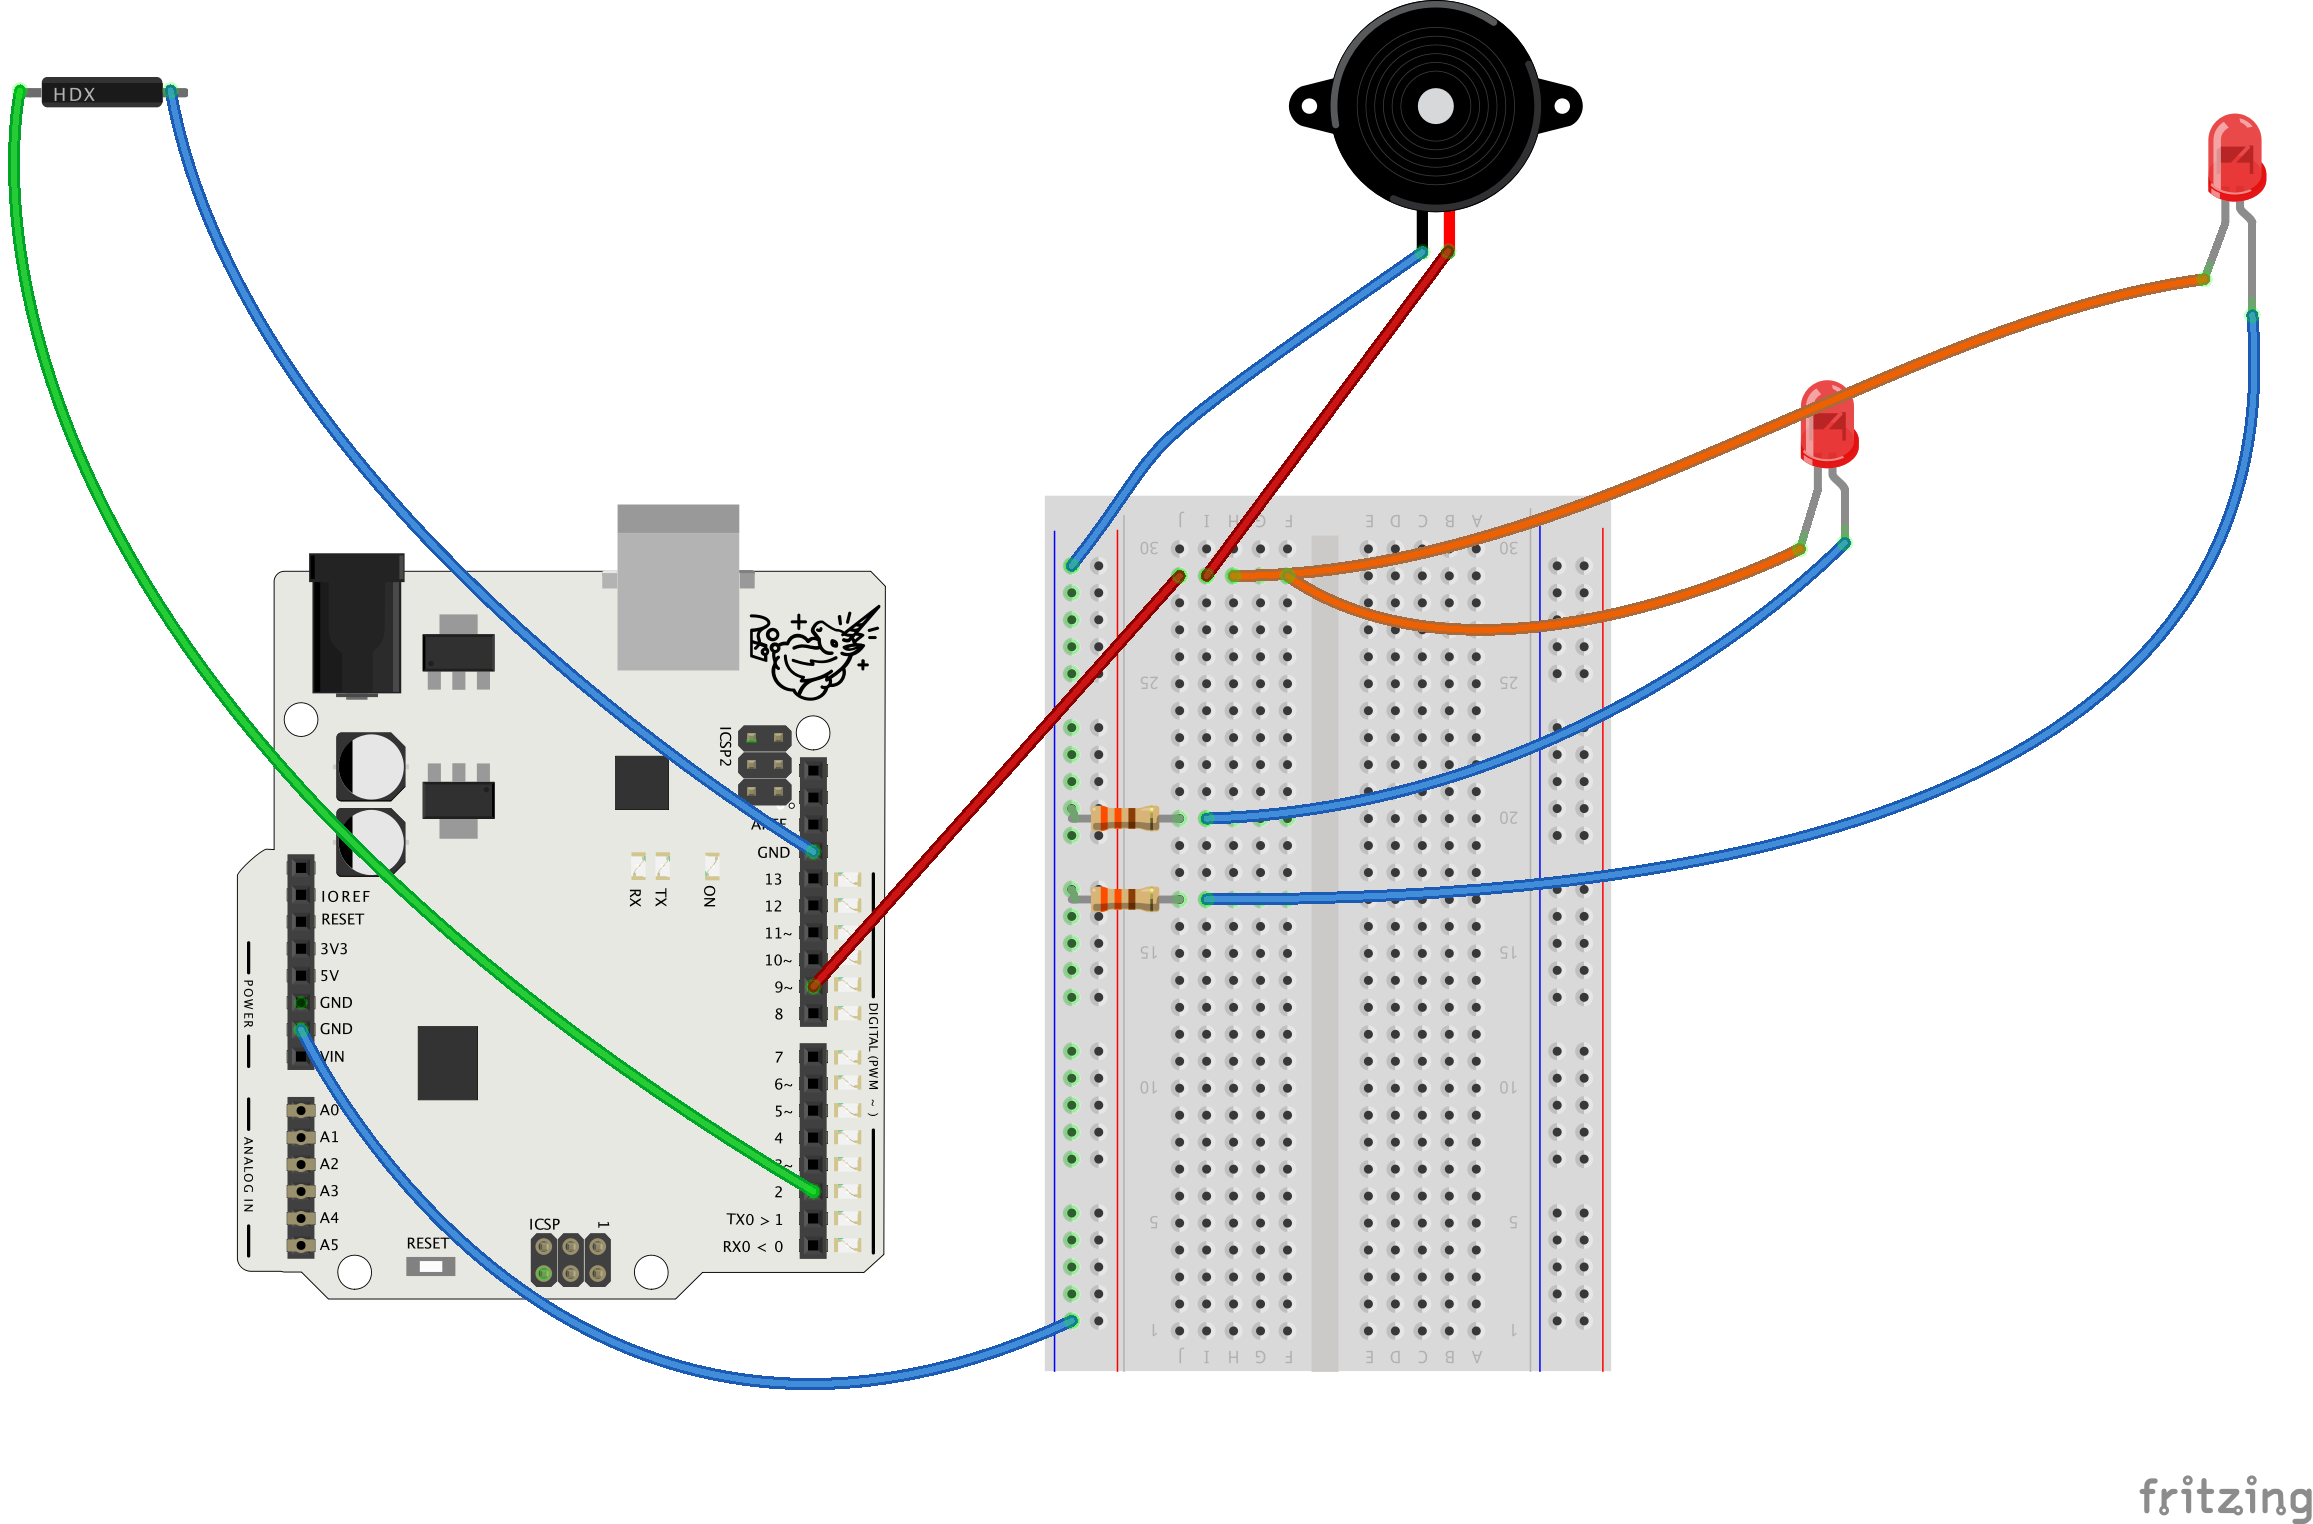
  • Detecting a position / triggering event with the tilt switch
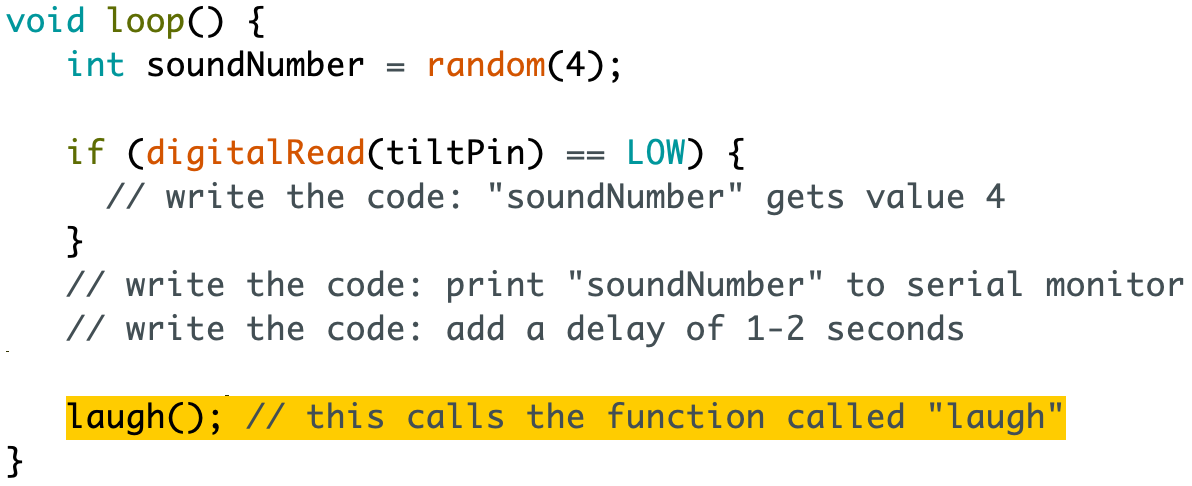
  • Editing / calling external functions
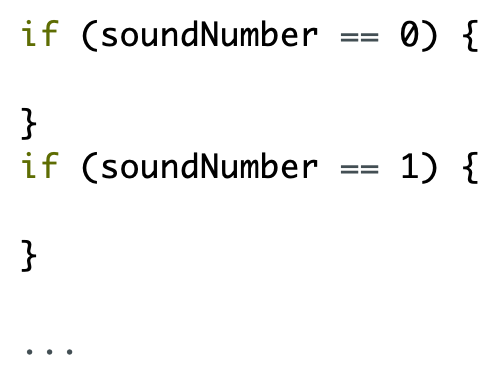
  • Creating random actions / multiple options

Learning Objectives

The student…

  • …can implement previous knowledge acquired from the Basics-module.
  • …can use external libraries in its own projects and recycle code from other creators.
  • …can tweak the code to obtain more precise results.
  • …can write a simple program and upload it to Arduino.
  • …understands how a tilt switch works.
  • …can integrate several components in a creative way.

Troubleshooting

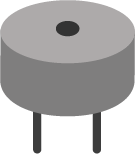
  • Try to tape the tilt switch in an angled way. Test it before closing the “creature”.
  • If you tape the tilt switch vertically with the creature’s body, the sensor won’t move to the desired position.

Introduction


What is the action that makes Timo go to sleep?

Parts


Do this

Collect these parts. In addition to them you will need an Arduino UNO or Mehackit Board, a USB cable, a breadboard and a bunch of jumper wires.

PartImageDescription
Extension wires (F-F)You'll need female-female extensions so you can connect your sensors to the jumper cables that will connect to Arduino!
Tilt SwitchThe tilt switch will tell when your creature is laying down or when it's standing!
Piezo speakerThe piezo speaker will be the "voice" of your babbling creature!


EXTRA - For adding the "blinking eyes" to your creature you'll need the following components:

PartImageDescription
2x LEDLEDs conduct electricity in one direction only. The longer leg is connected towards the 5V pin or later on a programmable digital pin.
2x Resistor 330Ω (or 220Ω)Resistor resists the flow of electric current. The value of the resistor is measured in ohms (Ω). The resistance value is coded into the colored stripes (330Ω: orange, orange, brown and gold). You can replace the 330Ω resistor with a 220Ω one.

How does a piezo speaker work?

Wiring is Inspiring

Transcript

In this project, you can connect the wires directly to your Arduino. So for this one, you can keep the breadboard in the drawer! That's pretty cool! First, you need to connect the extension wires to the legs of the piezo speaker and the tilt switch too, and then to these last ones, you'll connect regular wires, like this. I used some tape to make the extensions more steady. With extra wires, you can connect sensors and components where you want in your projects. Just tip for you: If you run out of extension wires you can make the wires longer by soldiering them together. It's really easy! Now, you just need to connect these two components to the board. You will connect the piezo speaker to the pin number 9 and then the tilt switch to pin number 2. Don't forget that both of them need to be grounded. So you need to connect the loose wires of the piezo and the tilt switch to the ground pins. There are three of them, choose any two that you like. Nice to remember that some components have polarity, meaning that there is a positive side and a negative side. This defines the direction of the electricity flow. In this case, the components we are using don't have polarity, so it doesn't matter which leg you connect to GND or the digital pin as long as the circuit is closed, you're set to go. The next part is to connect the tilt switch and the piezo inside of the creature. The tilt switch, as you know, can be closed or open, according to the position it takes. The switch in your creature should close when it lays down. Tape the tilt switch vertically, so when the creature lays down, the switch will change its state. About the piezo, well this one is simple, right? Just attach it anywhere in or on the creature so the sound really comes out of it. Now that all the wiring is done it's time to bring this creature to life!

Do this

Now, you'll connect the components to the board according to the diagram below.

  • Connect the extension wires  to the legs of the piezo speaker and the tilt switch.
  • Connect the jumper wires to the extension wires.
  • Connect these last ones following this order:
  1. Connect the wires attached to the legs of piezo speaker to pin 9 and GND.
  2. Connect the wires attached to the legs of tilt switch to pin 2 and GND.

Does it matter which one of the two legs of the tilt switch you connect to pin 2?

Give Life to the Creature

Transcript

The creature is finally standing up, but it's still too quiet! Is it just bored with being here, or did we forgot something? We did! You need to give instructions to the creature, so it can "talk"! How about this: if the creature is standing, it babbles random noises, to the piezo. But, if for some reason the creature lays down, it starts sleeping and snoring. As soon as you pick it up it continues babbling again. I guess you already understood what is triggering the sleeping sounds. Exactly! The tilt switch! It's time to make some noise now! Open the Arduino environment. We need the two main functions: "setup" and "loop". It's a good idea to save the project at this point and give it a good name, so you can find it easily, and maybe reuse the code for other projects. Go to "File -> Save as". I've saved mine and called it "noisy_creature". Your next step will be creating an extra file that you can call "notes.h". This file is called a library file. All library files have names at end with ".h". This specific one will contain all the names and values of notes that will be played by the piezo speaker. To create this file, just click the arrow in the the top right corner of the Arduino environment and choose the option "New Tab". The Arduino environment will ask you to name the file. Name it "notes.h". To save some time, you will copy code already made from the link that you see on the page of this video, and you will select it all, copy it and paste it in the "notes.h" window that you created. Finally, save the code again

Do this

For this part of your project, do the following steps:

  • Copy the code from this link, as referred in the video: Link to “notes.h” library
  • Create a new tab in the Arduino environment by clicking the “arrow” button on the right side of the screen
  • Press “New Tab” and name the tab “notes.h”
  • Save the sketch

Why did you copy all that code to the tab called notes.h?

Select Sounds at Random

Transcript

Now it's time to write down the main code. First, you need to think about how your creature will act according to two behaviors. The first behavior is when your creature is standing, Arduino will play random sounds. But, when the creature lays down, the switch will close! That's when it should stop making random sounds but start making a sleeping sound, in our case a cricket noise. You will start by typing a "#" and then writing the word "include" and "notes.h" inside quotes. This will tell the Arduino to fetch and make available the contents of "notes.h". After that, define the "piezoPin" to the pin number 9 of your board and the "tiltPin" to the pin number 2. Both have the type integer, which means they can store whole numbers, as you already know. As you noticed, two variables were created and given the values 9 and 2. You did that because, in case you want to connect a piezo and a tilt switch to some other pins, for any reason, you just need to change the numbers here and not in the rest of the code. It's way easier! Then, inside the "setup", define the modes of the pins. The function "pinMode" will do that job. Pin 9 is used to output signals to the piezo speaker and pin 2 will detect if the tilt switch is closed or open - so it's an "INPUT_PULLUP". It will be helpful to know what's going on in the program, so you'll activate the serial monitor with the function "Serial.begin". Write the next piece of code, inside the "loop" function, where all the commands are repeated over and over again. The first thing to do, is to create the variable "soundNumber". For example, "random(4)" will create random numbers between 0 and 3. Why? Because we will have 4 different sounds for the creature when it's standing. The numbers define which sounds to play. Later you'll give every sound a number! Don't forget that we will also give a fifth sound. That's the one the creature will play when it falls asleep! You know how to check if a switch is closed or not? You need an "if" statement for that. With this "if", you check if the state of the tilt switch is "LOW". Use the function "digitalRead" to check the state of the tilt switch. So, with all that you know now, I'm going to ask you to write some of the code! What do you say? Are you up for the challenge? Here's what I'll need you to solve, so we can move on to the next step: First, inside the "if" statement I want you to write a code that changes the value of the variable "soundNumber" to number 4. It will be useful to see the values from the serial monitor. Do you remember how to make them appear? Write the comments outside the "if" statement. Also, add a delay of 1 or 2 seconds so the results are shown at a nice speed. And don't forget to upload the code in the end.

Do this

Write the following code:

  • Or you can copy it from here: code for the sketch.
  • Write the code that will give soundNumber the value 4 when the switch is LOW.
  • Write the code that will print the value of soundNumber in the serial monitor. This way, you'll see which sound is being played by your creature later on.
  • Write the code that will add a delay of 1-2 seconds to the end of the loop part.
  • Save your sketch, after all these steps.

Open the serial monitor and see what numbers it prints when you turn the tilt switch.
What values are printed in the serial monitor when the tilt switch is open “(digitalRead(2) == HIGH)”?

Play the Sounds


Do this

After these steps you'll be able to hear the first sounds! 

  • Copy the code from the following link: Sound Functions.
  • Paste the code under/after the loop() function (not inside the loop part!)
  • Test sounds: write the name of some function to the loop part and upload the code to your board- you should hear how it sounds:
    \

Why do you need to copy the ready-made code and paste it outside the loop part?

Final Touches


Do this

Everything is almost ready! Just follow these steps to finish your project:

  • Write 5 new if statements, one under another. The condition of these if statements should be as follows: 


  The last one should be: if (soundNumber == 4)

  • Call a different sound function inside every if  statement.
    You can choose from the following sound functions: ohhh(), uhoh(), squeak(), laugh(), cricket().
    For example:


  • When the creature is lying down, the value of soundNumber is 4.  Decide which sound is the best for this case! We used cricket(), but you can choose any sound:
    \
  • Verify/Compile your sketch and upload it to your board. Also, save your code just in case.

If everything went well, the creature will babble now and repeat a sound when it falls down!


In your code you now have several functions that you call in the loop part. Which of the following statements is true?

What Next?


Do this

EXTRA: Timo's blinking eyes circuit

Build the circuit like in the picture, so your creature can have blinking eyes like Timo!\

Check the extra components above in the “Parts”-section

EXTRA: Timo's extra sounds

Did you know that you can ask Timo to make other sounds, too? You can explore the rest of the sounds in the code that you copied. At the end of the sounds functions, you'll find the extra ones: laugh2() and robot(). Try them out!


Links that you might find interesting:

  • Check Kati Hyyppä´s projects and get inspired! They are pretty awesome!
  • Or the Rapid Robots workshop at the FAB LAB BERLIN!
  • Also, give a look at Niklas Roy's projects! "Household Robot" is our favorite!
  • If you want your creature to be made out of a paper model, check at Free Paper Toys.

Learn More

Using Local Libraries

For this project, you created a library file called notes.h. This library file is a local one, meaning that is not shared by the Arduino's library manager

Using the command #include "nameExample.h" is a common thing to do in Arduino programming.
The command #include tells Arduino to use a specific library - which has a name that ends with ".h"

If you use #include "nameExample.h" it means that you're using a local library.

But, if you use instead #include <nameExample.h>, this means that you'll be using an external library instead, like the ones you'll find the Arduino library manager.

What is “notes.h”?

Arduino doesn't know how to send the names of the notes to the piezo, it only understands numbers.
On the other hand, writing notes as numbers is hard for a programmer.
When you add the additional file notes.h to the Arduino program, Arduino can look for code inside it.
notes.h is just a list of variables that have been given the names of notes.
The values of the variables are numerical values, which correspond to certain notes if you send them to Arduino

You can add files like this to Arduino, but remember that you must save them in the same file as your own program.

Using functions

As you noticed, you can also add functions to your code. A function is a named block of commands which defines an action.

Like for example the function laugh(), loop() or setup(). The last two are used in every sketch that you create - they are called reserved functions. But laugh(), for example, is a custom created function, to produce a laughing sound!

Tip: You can write your own functions to organize your code as a way of making it more readable.

Random(min, max)

You used the function random() to make your creature babble random sounds out of a list of sounds. For that, you defined the number of sounds that you’ll use and then you decided which sound should equal each of those numbers. Think about it as the shuffle mode in your MP3 player, deciding randomly from a list of songs that you have!