Exercise 2: Light Follower


Do this

Make a servo follow the direction of light!

This could be a prototype of, for example…

  • …a moving robot that follows light
  • …a mounting system for a solar panel to optimize the amount of light the panel gets
  • …any moving robot with sensors: you’ll learn about setting limits for variable values and using sensor values to control movement

Check out the parts and circuit below and get started! You will also get tips for the coding part.


Parts


Do this

Collect these parts and make the circuit!

In addition to these parts you will need an Arduino UNO or Mehackit Board, a USB cable, a breadboard and a bunch of jumper wires.

PartImageDescription
Servo motor (180 degree)Servo motor takes the position between 0 and 180 degrees, depending on how it's programmed. The servo has three wires, which are connected to a digital pin, to 5-volt voltage, and to ground.
2 x LDR

You need two light-dependent resistors in this mini project. The resistance of an LDR changes with the amount of light. The lighter it gets, the less an LDR resists electric current.

2 x resistors, 10kΩ (10,000Ω) 

You need two 10 kilo-ohm resistors in this mini project. 10 kilo-ohm (10,000 ohm) resistor is used with an LDR. Stripe colors: brown, black, orange, gold


Circuit


Programming Tips

Transcript

I'm not going to explain how to code the whole thing because you know most of it already from the earlier chapters. You can write your code under the comments. The comments are hints for what you need to do and you can leave them there. Just write code under each comment. Test your program often so you catch mistakes early on. The beginning is easy. You define some integer variables here and create a servo object. The setup is easy, too. You attach the servo and start the serial communication. Now there's one new thing here. You need to set the servo to a starting position, which needs to be done only once. So that you will write into the setup part. The loop part starts off easy as well. Here you'll store values you get with the analog read command to variables. But now comes the part where you move the servo. First you need to compare which LDR gets more light and change the servo angle accordingly. Then you need to check if the servo has reached the maximum or minimum angle already with an if statement. To compare the LDR values you need to write an if statement like this. If ldr1 is greater than ldr2 then the code changes the angle a little bit. You can try two degrees, or one or three. Then if the value of ldr1 is smaller than ldr2 you change the angle to the opposite direction. If you decrease the angle up here what do you need to write in this part? Angle is just a variable that stores a number. To move the servo you need to put the right command to the end of the loop part and give angle to it as a parameter. Now it might be a good time to see what the angles really are. I'll print all values I have to the serial monitor. Ldr1, ldr2 and angle. Now look at this. Servo can only move between 0 and 180 degrees but if the code is like this angle can get bigger and smaller values and the servo won't work well. Let's fix that, too. Write an if statement where you check if the value has gotten too big. And the same goes for the lower limit. What's the smallest value the motor can get? What do you have to write inside the code block? And that's it, pretty much. In a nutshell, turn the motor little by little towards the LDR that gets more light. And if the variable angle gets too big or too small limit that value. Happy coding!

Do this

Copy and paste this code to your Arduino IDE.

  • Replace all comments with your own code!
  • If you run into trouble, ask your teacher for advice.
  • Note: There’s more than one way to program the servo to follow light. This is one way to do it! If you have your own idea of how it should be done, feel free to try and code the whole thing from scratch.
// include the servo library
// create a variable for the first ldr
// create a variable for the second ldr
// create a variable for the servo angle, give it a good starting value
// create a servo object and name it


void setup() {
  // tell Arduino which pin the servo is connected to
  myServo.write(angle); // this sets the servo to the starting angle (only once)
  //start serial communication
}

void loop() {
  // read the value from A0, store to a variable
  // read the value from A1, store to a variable
 
  // create and if-else structure, where
  // 1) servo angle gets 2 degrees smaller if the value from the first ldr is bigger  
  // than the value from the second ldr
  // 2) servo angle gets 2 degrees bigger else if the value from the first ldr is smaller
  // or equal than the value from the second ldr
  //  Note: use these symbols  <=  (smaller or equal)
  // create an if statement that 
  // returns the servo angle to 178 if servo angle is greater than 178
  

  // create an if statement that 
  
  // returns the servo angle to 2 if the servo angle is smaller than 2

  // use serial monitor to see ldr values & servo angle, as needed
  // set the servo to an angle defined by the correct variable with the write command 
  // a small delay here

}

Educator notes

If the students need help with their code, it is a good practice to first encourage them to solve the problem by themselves. Try asking questions and troubleshooting collaboratively.

Questions:

  • Have you checked the console - are there error messages when you upload the code? What do the messages say?
  • Have you checked your circuit, could there be bad connection?
  • Can you describe what you were trying to do? Describe the problem in as much detail as you can! (Often a problem gets solved just by explaining it to another person - a classmate or the teacher!)
  • Do you remember an earlier task or exercise where you learned about the part you’re struggling with? Have you tried looking at those earlier examples?
  • Has anyone else in the classroom run into the same problem? Could they explain how they solved it? (Peer learning is a powerful experience both for the one who’s instructing - the person who already managed to solve the problem on their own - and the one who’s receiving instructions. More powerful than simply hearing the right answer from the teacher!)
  • If none of these tips are successful, look at the student’s code and try to troubleshoot together with them. Show parts of the ready-made code as the last means.

NOTE: if the student has decided to code their own solution which is different from this example, that’s great! It’s completely possible to code this exercise in a different fashion. However, the ready-made code example below may not be very helpful in this case.

Code Example

//include the servo library:
#include <Servo.h>
//variables for storing values from LDRs:
int ldr1;
int ldr2;
//variable for the servo angle, initial value 90:
int angle=90;
//create a servo object:
Servo myServo;

void setup() {
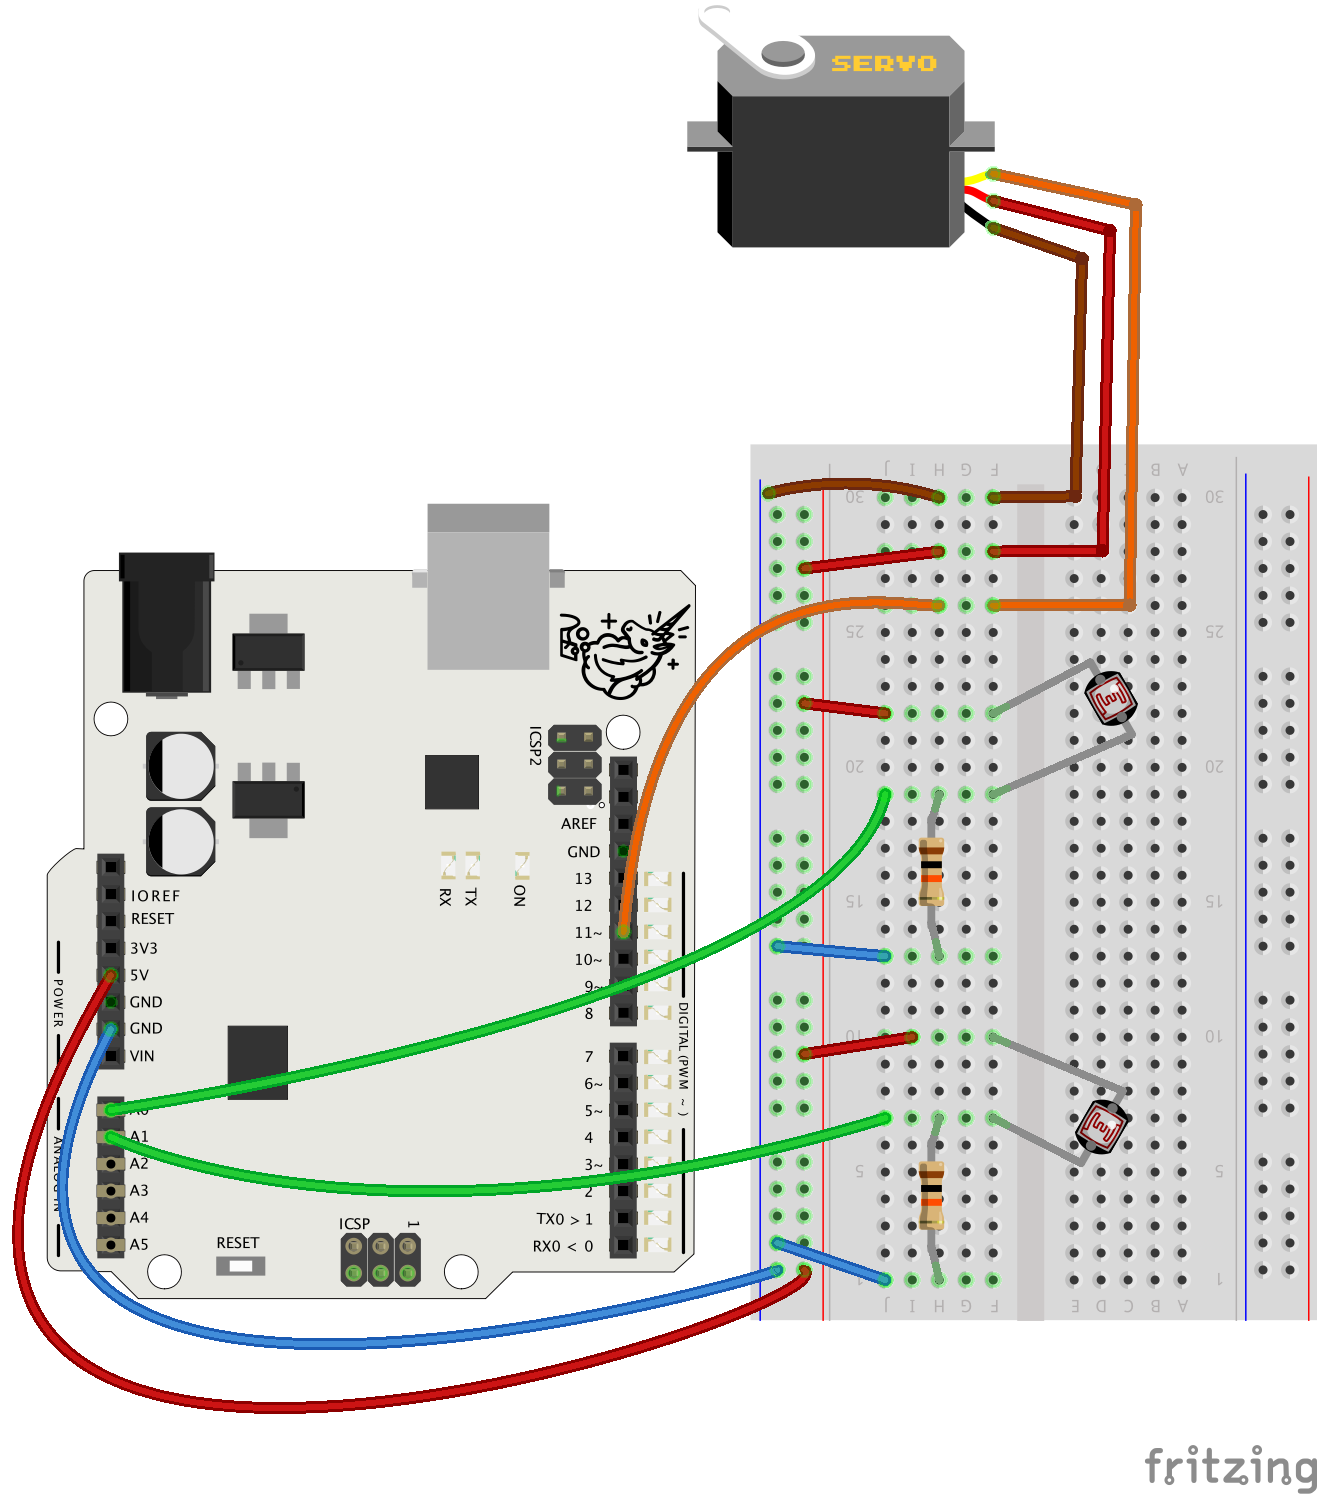
  myServo.attach(11);   //servo is connected to pin 11
  myServo.write(angle); // set servo to starting ange
  Serial.begin(9600);   //start serial communication
}

void loop() {
  //read both sensor values and and store to variables:
  ldr1 = analogRead(A0);
  ldr2 = analogRead(A1);

  //if value from ldr1 is bigger than ldr2,
  //decrease the angle by 2 degrees:
  if (ldr1 > ldr2){
    angle = angle - 2; 
  //else increase the angle:
  } else if (ldr1 <= ldr2){  
    angle = angle + 2;
  }
  //check if the angle has reached the maximum.
  //if it has, set angle to 180.
  if (angle > 180){
    angle = 180; 
  }
  //check if the angle has reached the minimum.
  //if it has, set angle to 0:
  if (angle < 0){
    angle = 0;
  }
  
  //print values for debugging purposes:
  Serial.print("ldr1: ");
  Serial.print(ldr1);
  Serial.print(" ldr2: ");
  Serial.print(ldr2);
  Serial.print(" angle: ");
  Serial.println(angle);
  
  //finally, set the servo to an angle: 
  myServo.write(angle);
  //a small delay:
  delay(20);
}