Game Studio
An introduction to object-oriented programming
There is no one way to program. In the last chapter, you started dissecting your program into smaller elements, which you then called from within the draw method. This method of programming, where a program is split into smaller subroutines, is called procedural programming. We now delve into more complicated functionality through object-oriented programming (OOP). There are vast amounts of material available on the subject and what you see here barely scratches the surface.
In OOP, the structure of a program is made up of different object, each with their own roles and responsibilities in making the program work . The object can store information and execute different methods when called. For example, an object called Player could store within it the player's coordinates, a move method to alter them and a draw method to draw the player's character at the location specified by the coordinates.
Classes and objects
We've previously looked at different types of variables. For instance,
'x' is of the int (integer) type, if it has been defined as
int x = 0; Similarly, a variable entitled 'name' is of the String
type, if it has been defined as String name = 'Sarah'. In object
oriented programming, classes work in a similar fashion.
Le't's think of a class called ''BankAccount" . On a bank account, there is usually a sum of money and you can withdraw and deposit money into it. The following snippet of code creates a new object of the "BankAccount" class and saves it into a variable called "account".
BankAccount account = new BankAccount();
Objects are the concrete manifestations of classes in that they define what objects are like and how they work. Before an object belonging to a class is created using the 'new' command, class methods can't be accessed. A class is like the floor plan of a house: we can't go and visit the house if all there is is the floor plan.
Even so, we need the floor plan to be able to build the house. Let's define a very simple class called Player and start by adding a new tab. This makes handling multiple objects easier:
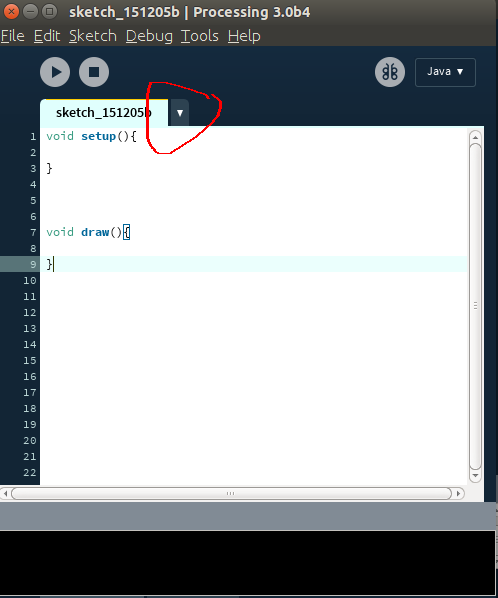
Click on the spot marked in the image, pick "new tab" and give the new tab the name "Player". Let's now define a simple Player class in the new tab as follows:
class Player {   // the definition of the Player class is within curly brackets
// each object in the class now knows its coordinates
  float x;
  float y;

// this is a constructor
// it is run every time a new object of the Player class is created
  Player(){
    this.x = 50;   // gives the new object a location
    this.y = 50;   // this.x ja this.y refer to variables within the object
  }
}
We have now defined the Player class. Next, we need to create a new object in the class. A new object is created using the 'new' command in the first tab:
Player player;

void setup(){
  size(500, 500);
  player = new Player(); // creating a new object of the Player class  named player
}

void draw(){

}
'new' then calls the class constructor, which assigns the object its x- and y-coordinates We now have an object in the player variable, positioned at (20, 20) on the screen Now the object can be treated the same as any variable. It can be used as a method parameter, for example.
Programming task
Write a snippet of code, where you create a new object of the Adventurer class, save it into a variable and call the class method “recover”. Only create the object and call the method.
Here is the Adventurer class for testing purposes:
class Adventurer {
  int health;
  Adventurer() {
    this.health = 10;
  }
  void recover() {
    this.health += 1;
  }
}
Programming task 2
In this task, the Adventurer class constructor takes the player name as a parameter.
Create an object of the Adventurer class and call the class method “info”.
Here is the Adventurer class for testing purposes:
class Adventurer {
  String name;
  Adventurer(String givenName) {
    this.name = givenName;
  }
  void info() {
    print("Name: " + name);
  }
}
Class Methods
Our Player object isnt actually doing anything yet. Let's add a couple of methods into the mix for a little action. Class methods work exactly like conventional custom methods, except in that they are always called through particular objects.
Let's create new draw and move methods for the player class. Draw draws a desired pattern when called, whereas move changes the location of the player object:
// The definition of the player class is in curly brackets
class Player {

// each object in the Player class is aware of their x- and y-coordinates.
  float x;
  float y;

  Player(){        // this is a constructor: it is always run
                    //when creating a new object of the Player class
    this.x = 50;    // we assign the new object with a position
    this.y = 50;    // this.x and this.y refer to variables within the object
  }

// define within the draw method what we want our character to look like
  void draw(){
    fill(255, 255, 0);
    arc(this.x, this.y, 50, 50, QUARTER_PI, TWO_PI-QUARTER_PI, PIE);
    fill(0);
    ellipse(this.x, this.y-10, 5, 5);
  }

// the move method gets two integers as parameters
  void move(int heading_x, int heading_y){
    this.x += heading_x;    // adds these parameters to the coordinates of the player object
    this.y += heading_y;    // tarkoittaa samaa kuin this.y = this.y + heading_y;
  }
}
Now we can call object methods. Because it's an object method, the call
is not draw(); but player.draw();
Player player;

void setup(){
  size(500, 500);
// creates a new object of the Player class named player
  player = new Player();
}

void draw(){
  background(255);
  player.draw();  // calls the draw method of the object player()
}

void keyPressed(){
  // the keyPressed method is called whenever a key is pressed.in this particular instance, any of the arrow keys. you can use an else if -structure
  // or make all four into separate if statements.
  // then call the move method with the appropriate parameters.

  if (keyCode == RIGHT){
    player.move(10, 0);
  } else if (keyCode == LEFT){
    player.move(-10, 0);
  } else if (keyCode == UP){
    pelaaja.liiku(0, -10);
  } else if (keyCode == DOWN){
    player.move(0, 10);
  }
}
Try running the above. You now have something of an idea about object-oriented programming. For a closer look, you may want to see the object tutorial on Processing.org.
Elements of a Game
We've now had a peek into object-oriented programming. We'll now add a couple of typical gaming elements onto our program using objects.
Two Objects
We now want to create a new object, to be eaten by our player character. To achieve this, we need two things: first of all, we have to define a new class for a new type of object, Blob. Second of all, we have to develop an algorithm to help us determine, whether the player and the button are close enough to each other for the player to eat the blob.
Let's first create the new Blob class by opening a new tab and defining the class within it.
// The definition of the Blob class is in curly brackets
class Blob {

// each object in the Blob class is aware of its x and y coordinates
  float x;
  float y;

// this is a constructor: it is run every time
// a new object of the Blob class is created
  Blob(){
    this.x = random(0, width);    // randomly assign the new object a position
    this.y = random(0, height);   // this.x ja this.y refer
                                  // to variables within the object
  }

// this defines within draw, what we want the blob to look like
  void draw(){
    fill(255, 150, 0);
    ellipse(this.x, this.y, 20, 20);
  }
}
As you will have noted, Blob is a very similar class to Player. The new blob object is also created in much the same way:
Pelaaja player;
Blob blob;   // set the object as a global variable

void setup(){
  size(500, 500);
  player = new Player();
  blob = new Blob():    // creates a new object of the Blob class
                              // and places it within a variable called blob
}

void draw(){
  background(255);
  blob.draw();    // calls the draw method of the blob object
  player.draw();
}

void keyPressed(){
  if (keyCode == RIGHT){
    player.move(10, 0);
  } else if (keyCode == LEFT){
    player.move(-10, 0);
  } else if (keyCode == UP){
    player.move(0, -10);
  } else if (keyCode == DOWN){
    player.move(0, 10);
  }
}
Colliding Objects
We now have two objects and we want them to react to each other in a certain way when they collide. We now have to find out whether they are of such size and in such a location that they would collide.
We can easily find out the location of each object:
float player_location_x = player.x;
float player_location_y = player.y;

float blob_location_x = blob.x;
float blob_location_y = blob.y;
But what about object size? We've defined object size as a hardcoded value in a drawing method. This is not ideal. If we want to change the size of an object on the screen, we have to individually change each of the command parameters within the drawing method.
Let's adjust our code to make object size a variable of its own. Functionality will remain the same, but the code becomes easier to maintain and develop further. Such adjustments are referred to as refactoring.
Refactoring
We define a new variable within the Player class assign it a value in the constructor and then use this variable inside the draw method.
class Player {
  float x;
  float y;
  float size;   // this defines a new variable, size, within the class

  Pelaaja(){
    this.x = 50;
    this.y = 50;
    this.size = 50;   // sets character size at 50 in the constructor
  }

  void draw(){
    fill(255, 255, 0);
    // body size
    arc(this.x, this.y, this.koko, this.koko, QUARTER_PI, TWO_PI-QUARTER_PI, PIE);
    fill(0);
    // determines eye location and size in relation to character size
    //  eye size is 1/10 of character body size
    ellipse(this.x, this.y-(this.size/5), this.size/10, this.sizw/10);

  }

  void move(int heading_x, int heading_y){
    this.x += heading_x;
    this.y += heading_y;
  }
}
Refactoring the Blob class is a tad more straightforward:
class Blob {
  float x;
  float y;
  float size;    // set size as variable for Blob class

  Blob(){
    this.x = random(0, width);
    this.y = random(0, height);
    this.size = 20;    // when creating a new object, give it a size in the constructor
  }

  void draw(){
    fill(255, 150, 0);
    // use a new modifier in place of the previous 20's
    ellipse(this.x, this.y, this.size, this.size);
  }
}
This may seem like an insignificant change, or even completely useless. Nevertheless, these kinds of structural improvements come in very handy as your programs become more complex. By using this type of structure (the size variable), we can change the size of the object, no matter how many squares, ellipses or lines it consists of.
Collision algorithm
When solving problems, it pays to start with a pen and paper. Once you've gotten your head around the problem and have at least some type of solution on paper, putting that solution into practice through programming becomes far easier. The more complex the problem you're faced with, the more time you'll spend staring at the wall, thinking and scribbling your thoughts on paper.
Let's try and make sense of what we're faced with by making a sketch of it. We have two circles and we want to find out if they collide with each other.
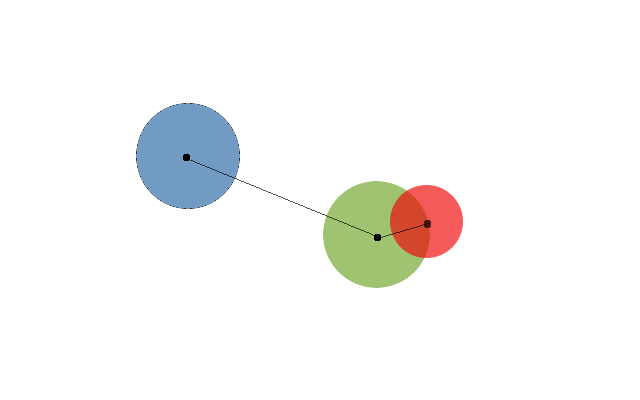
We'll draw a point to the centre of each circle and lines between them to illustrate their distance from one another. What else do we know about the circles?
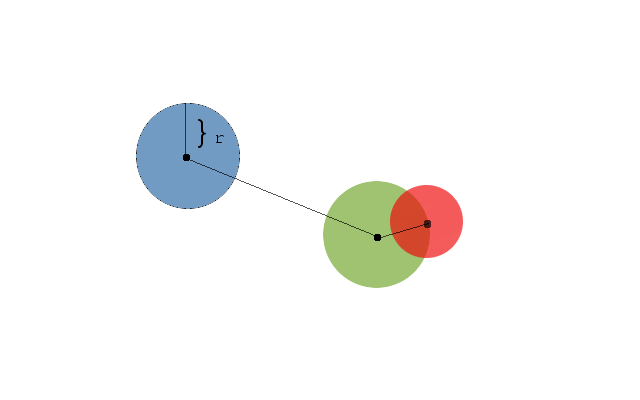
We know where the centre of each circle is, but we also know their radius. This enables us to determine whether or not the circles will collide. The big idea behind our algorithm is that two circles will collide if the distance between their central points is smaller than the sum of their radii.
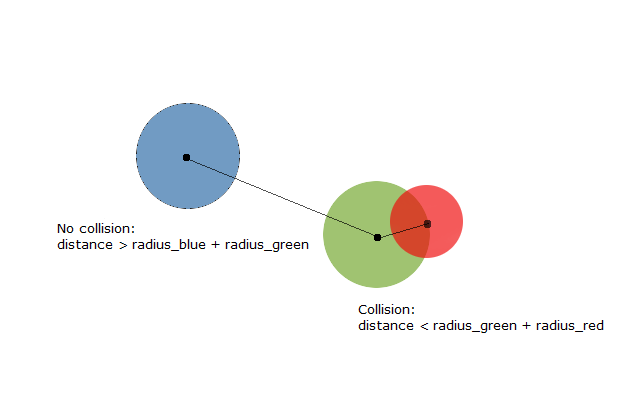
We can formulate our algorithm somewhere along these lines
- Calculate distance between points (d)
- Calculate sum of radii (sum_of_radii)
- Compare d and sum_of_radii
- d > sum_of_radii: no collision
- d < sum_of_radii: collision
Making the algorithm
We can now start putting our algorithm together, one step at a time.
We'll start by working out the distance between the player and the
blob. As we know the coordinates of these two points, we can make use of
the following formula, use to calculate the distance between two points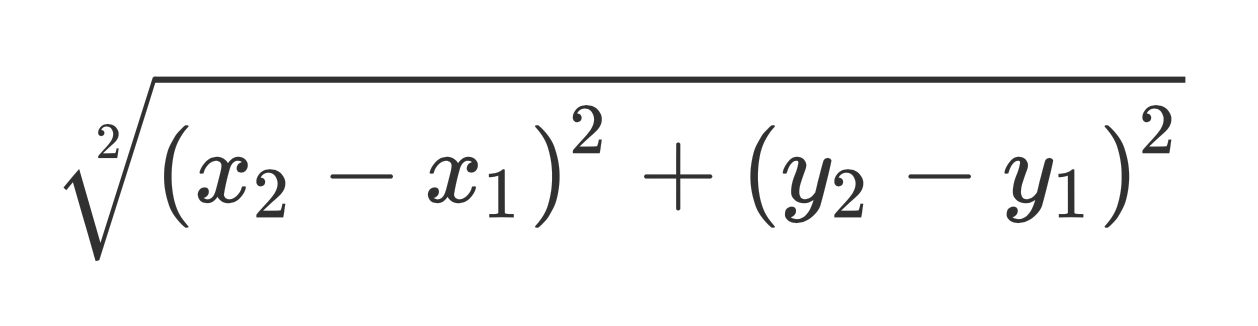
We'll create a new method called checkCollision, and perform the check
within it. The method will be called at every draw cycle.
Player player;
Blob blob;

void setup(){
  size(500, 500);
  player = new Player();
  blob = new Blob():
}

void draw(){
  background(255);
  blob.draw();
  player.draw();
  checkCollision();   // check at every draw cycle if
                       // player and blob collide
}

void keyPressed(){
  if (keyCode == RIGHT){
    player.move(10, 0);
  } else if (keyCode == LEFT){
    player.move(-10, 0);
  } else if (keyCode == UP){
    player.move(0, -10);
  } else if (keyCode == DOWN){
    player.move(0, 10);
  }
}

void checkCollision(){
  // first calculate the differences between x2-x1 and y2-y1
  float distance_x = player.x - blob.x;
  float distance_y = player.y - blob.y;
  // and use them to calculate the distance according to the formula
  // sqrt = square root
  float distance = sqrt((distance_x*distance_x)+(distance_y*distance_y));
}
Next, we'll work out the sum of the radii.
void checkCollision(){
  // first calculate the differences between x2-x1 and y2-y1
  float distance_x = player.x - blob.x;
  float distance_y = pelaaja.y - blob.y;
  // and use them to calculate the distance according to the formula
  // (sqrt = square root)
  float distance = sqrt((distance_x*distance_x)+(distance_y*distance_y));

  // the circles' diameter is in the size variable,
  // so we'll divide size by two.
  float sum_of_radii = (player.size/2) + (blob.size/2);
}
And lastly we'll compare the distance and the sum of the radii with an if statement:
void checkCollision(){
  // first calculate the differences between x2-x1 and y2-y1
  float distance_x = player.x - blob.x;
  float distance_y = pelaaja.y - blob.y;
  // and use them to calculate the distance according to the formula
  // (sqrt = square root)
  float distance = sqrt((distance_x*distance_x)+(distance_y*distance_y));

  // the circles' diameter is in the size variable,
  // so we'll divide size by two.
  float sum_of_radii = (player.size/2) + (blob.size/2);

  // if the player and the blob collide, print text
  if (distance < sum_of_radii){
    text("collision!", 50, 50);
  }
}
Now we have a somewhat working collision detector for two circles. It's not perfect, but will do, as we develop the first version of our game. If you want to familiarise yourself with different kinds of collision detection algorithms (eg. in order to implement collision detection between rectangles), Jeffre Thompson's book Collision Detection with it's code examples is an excellent read.
Project: Making your own game
You now know a little something about object-oriented programming and collision detection. These are crucial to game mechanics. Even so, your game can be whatever you want it to be. The things covered in this chapter aren't essential to the assignment in any way.
You can look for inspiration for your own game by looking at games others have made on OpenProcessing.
If you want more detailed instructions or help with making a game of an existing format, you can try looking for tutorials online ("pac-man tutorial processing", "mario game tutorial processing" etc.). Here, you can find instructions for a Mario clone and a Pong clone using Processing.
The game mechanics don't have to be complicated. The simplest games are often the most addictive!
Example: Pong
The Pong clone below is not much more complicated than the two-object shell or a game we looked at before. The ball and the player are both governed by their own movement methods, which are called at every draw cycle.
(Finnish) Voitit = you won Hävisit = you lost