Array Storm

Educator notes

Transcript

Hi, I'm Joaquin from Mehackit! This is the last chapter of the Basics module. You have learned to locate things on the canvas, create animations and to interact with the programs. Next you will learn to use arrays in programming. Until now you have drawn just a couple of shapes to the canvas at a time. With arrays it's easy to handle larger amounts of data and make more things happen simultaneously. In this chapter students learn to use arrays to make a rainstorm with hundreds of raindrops. After making some experiments with arrays, discuss with the students what they want to do as a final project. You can emphasize that the project doesn't have to be too ambitious - It's okay to pick an exercise from an earlier chapter for example and just make a modifications to that. The main goal of this module has been to teach basic programming skills and to build a mindset to use those skills creatively. Some students might want to go deep into programming but some others might find the artistic side of the project more interesting: which colors an image creates the best atmosphere what's unique and personal about this project and what do they want to express with it. Think about how to showcase the projects. Students can present their projects to each other in the classroom but it's even better if it's possible to have a proper exhibition. How about projecting the works to the walls in the hallway where others can see them and even use them if they are interactive? The students may have a lot of questions at this point. You can't know everything yet. The most important thing is to always define the next small step together with the student. Start with something simple it's a good general guideline when approaching complex things. After this basics module is time to choose the first project module and get to the fun part of Art Programming!

Length of the chapter: 60-120 min

  • Adjust the length of the chapter according to the time you have at hand.
  • There is a more detailed lesson plan below.

Learning objectives of this chapter

Students learn…

  • … to create an array of integer numbers.
  • … to create a for-loop that goes through the array and uses the numbers as locations or speeds of shapes.
  • … to understand that each number in the array has its’ own index.
  • … to use arrays as a creative tool to make a lot happen on the canvas simultaneously.
  • … to continue with the most interesting topic of this chapter and develop it further.

Slides and Lesson Plans

You can use the slides below to introduce the fourth chapter to the students.

The fourth chapter includes only one topic which is about using arrays in visual expression. It is labeled as an extra-topic because using arrays requires a bit more abstract thinking than the previous module. It’s possible to skip the topic and start the project right away but encourage the students to at least try it out! They don’t have to understand everything in order to play with the arrays and produce fascinating results.

There’s a lesson plan for this chapter below the slides.


Lesson Plan (60-90 min)

Time to completeActivity
10 minSCRUM routine: Students explain to others: 1) what was the last thing they did on the previous lesson and 2) if they had any challenges they need help with. If students are shy to speak when others are listening, you can go and talk with them individually later on.

It doesn't matter if some students are still completing the tasks of the third chapter. You can help those students after introducing the fourth chapter to everyone.
15 minIntroduce the fourth chapter with the slides above. 
45-90 min

Students can either proceed to extra-topic Array Storm or start the final project of this module right away. 

Go around in the classroom while the students are working and discuss briefly with each student. If students are starting their project, have a short discussion with them. There's more ideas for facilitating project work in the Educator Notes of the topic.

    • What kind of things have you created during this module? What did you like the most? Why did you like it?
    • What would you like to do as your project? Could you use something you have created earlier or even combine several things in one project?
    • What kind of colors and imagery would you like to use? Could you use images you have drawn or photographed yourself?
    • What is the first step to make the project? How long does making of this project take?
    • Who could see/try this project after it's ready?
You can give a time-limit for completing the project, depending the time you have available. 
45-90 min

Students submit the code in Atelier.

Students can document their projects to google docs, their own portfolio or even school blog. Documentation helps assessment too. Open Processing is an easy way to share a project online without losing the interactive aspects. Check the topic Educator Notes of the topic for more ideas.

Students can also give a presentation of their project to everyone in the classroom


A Couple of Raindrops

Transcript

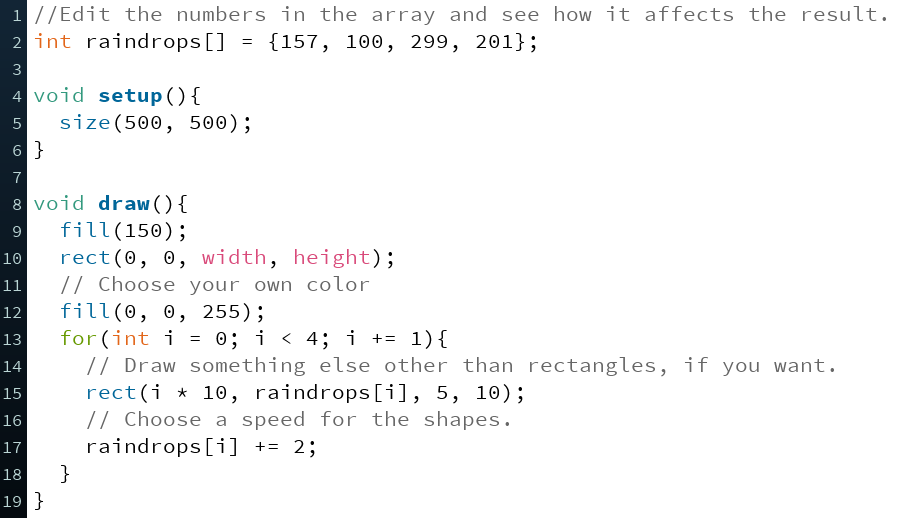
Hi, I'm Joaquin from Mehackit! Here's a familiar-looking program. The shape falls from the top of the canvas and when it reaches the bottom it appears again from the top. This time I wanted to create a shape that falls from the sky and looks like a raindrop. The raindrop looks quite lonely there. How can I make a storm with hundreds of raindrops? I could add a second raindrop with a new variable but that means I have to write a lot of new code. A lot of work for a second raindrop. It doesn't look like it's raining yet. What if I need to add a fifty or a hundred raindrops? There's no point in creating new variables and if-statements for all of them. Luckily there's a programming tool called "array" which makes it easier to handle lots of data. Arrays are used everywhere in programming. For example the contact list in your phone is an array of contacts and an image just consists of an array of pixels. Now I'm going to create an array of raindrop positions. I'll delete some of the previous code and start with a new approach. At the top of the program I create an array of integer numbers and call it "raindrops". The word "int" tells the computer that the array will contain integer numbers. The next word is the name of the array. I named it "raindrops" because these numbers will tell the y-coordinates of the raindrops. Then there's something new: a couple of brackets. The brackets mean that raindrops will contain more than just one integer variable - it will contain a list of them. After the equals sign there's a list of numbers between curly brackets. This is the content of the array each number in the list is separated by a comma. So the array contains a unique position for each drop on the canvas. I've used numbers between 0 and 500 to make sure that the raindrops stay inside the canvas. Let's add a couple of rectangle-commands here. I'll give them different x-coordinates and use the values from the array as y-coordinates. Let's run the program. The y-coordinate of this first raindrop is raindrops[0]. The zero inside the brackets is called the index. It points to a certain element in the array and this time it's 157 because it's the first number in the list. In programming you always start counting from zero. The y-coordinate of the second raindrop is raindrop[1] - the second number in the list which is 100. By the same logic raindrops[2] is 299 and raindrops[3] is 201. Instead of defining four different variables you only have to make one array with four numbers in it. But how to move the raindrops? I just increase the y-coordinates of these shapes. By the way I can shorten the code a little bit here. Instead of writing the raindrops[0] two times I can just write "plus equals". It does exactly the same thing - it adds a value to the previous value. I'll do the same to the other numbers in the array. I'll use different numbers so that the raindrops have different speeds. That's better! However to make it look like rain I will need at least fifty drops. It is still quite a lot of work because you need a couple of lines of code for every raindrop and making a hundred raindrops would mean hundreds of lines of code. Soon you will learn a quick way to go through the whole array no matter how many numbers it has. But first, practice to use arrays in your code!

Do this
You get to code soon enough but now, just answer the multiple choices and continue forward!


int numbers[] = {30, 60, 100, 2, 249, 532, 8};
The code above creates an array called "numbers" What is the value of numbers[3]
What is the value of numbers[1]?

Educator notes

The concept of array is introduced here. Arrays can be thought of as variables that have a series of values inside them. Remind students that the index of the first unit is always 0, the index of the second unit is 1 and so on. In programming, counting always starts from zero. You cannot refer to the array without the index because an array itself doesn’t have any general value. Each element of the array always has its own value.

For the First Time

Transcript

So how to go through an array without so much trouble? I'll show you a handy tool called the for-loop. First I'll replace part of the code with a for-loop that goes through the whole list automatically. Inside the for-loop I refer to the array. But what to put inside the brackets? I'll add the "i" that is defined here in the parentheses of the for-loop. Let's run the code now. It works! But what is actually happening inside the for-loop? There's three important parts in a for loop. 1) What happens when the loop starts the very first time? 2) What's the condition for the loop to continue? And 3) what happens every time the loop is executed? Before the loop start it creates a variable called "i" which has an initial value of 0. Then after a semicolon it says "i" is smaller than 4. The loop will continue as long as this condition is true. The last part adds one to the variable "i" before the loop is repeated. In plain language the variable "i" goes through numbers from zero to three one by one. By putting the variable "i" inside the brackets you can go through the whole array and use every number in it. At the first round we increase raindrops[0] by 2. On the second round we increase raindrops[1] by 2. On the third round we increase raindrops[2] by 2 and on the fourth round we increase raindrops[3] by 2. And then the for-loop ends. It begins again when the draw method begins again. The code is already much shorter than in the beginning. But the rect-command is still repeated several times. You can simplify the code even more by replacing the previous rect-commands with only one command inside the for-loop. But wait, now there's a problem! The raindrops used to spread out horizontally but now the x-coordinate is always the same, one hundred. How can you make the raindrops appear at different horizontal spots? Let's use the variable "i" as the x-coordinate The x-coordinates are still almost the same because I only goes from 0 to 4. If the x-coordinate increases by just a few pixels it doesn't make much difference. I multiply the "i" with ten to create more variation. This is better. When the for-loop goes around for the first time "i" is zero and the x-coordinate is 0 times 10 which makes it zero. On the second round "i" is 1 and the x-coordinate is 1 times 10 which makes it 10. On the third round the x-coordinate becomes 20 and so on. In other words the horizontal distance between the raindrops is always 10 pixels. Next I'll make a longer array and change the speeds of their raindrops.

Do this

Write the example in the video (below).

Choose your own colors and draw other shapes than rectangles, if you like.


See the code above. Which of the following is true?
Which of the following is true?

Educator notes

For-loops can be a bit difficult to understand at first. It might be a good idea to go through them together as a class. Explain that the variable “i” is used only for going through the array in the given example - it’s the only function it has. First, “i” is 0, then 1 and so on. The loop stops when the middle condition (e.g. i < 4) is no longer true. That means that if the variable “i” becomes 5, the loop stops and the computer moves on to execute the commands after the for-loop.

It’s possible to name the variable “i” another way. “i” is a common and conventional name used in many programming languages. https://www.quora.com/Is-i-short-for-index-or-iterator-in-a-for-loop-clause


Make it Rain

Transcript

Hi! Until now you have managed to move four raindrops across the screen. Let's go crazy and add fifty raindrops! The variable "i" in the for loop now goes from zero to four. What if I make it run all the way up to fifty? Oops, there's an error! My list is only four elements long and here I try to refer to elements like raindrops[5], raindrops[6] and so on - all the way to fifty. Those elements don't exist and the computer tells us that: the index gets out of bounds. The array includes just four numbers and that is why there are just four raindrops. If you want to have fifty raindrops you need more numbers in the array. But typing 50 numbers manually is inconvenient. Luckily there's an easy way to create a larger array. I'll show you how. The expression "new int[50]" means you have created a list of integers that is fifty units long. Now the length of the array is 50 and all the values are zero at first because I haven't defined otherwise. So raindrops[0] has a value 0, raindrops[1] too and so does raindrops[49]. But what about raindrops[50]? Remember that it doesn't even exist. The length of the list is 50 but the first unit has the index 0 so the last one is 49. Let's try running it now. Fifty raindrops! Let's make it a hundred! I also change the x-coordinate to "i times five" because otherwise the raindrops don't fit in the canvas. I managed to add more stuff to the canvas but now it looks like a row of blue tiles rather than a natural rainfall. There's still more work to do. See you soon!

Do this

Copy the code completed in the video from below.

Create a wider canvas by changing the first parameter of the size-command in the setup.

Create a longer array to draw more shapes to your wider canvas!

Change the condition of the for-loop so that it goes through the whole array.

// Create a longer array.
int raindrops[] = new int[100];

void setup(){
  // Create a wider canvas by changing the first parameter of the size-command.
  size(500, 500);
}

void draw(){
  fill(150);
  rect(0, 0, width, height);
  fill(0, 0, 255);
  // Change the condition of the for-loop (i < 100) so that it goes through the longer array
  for(int i = 0; i < 100; i += 1){
    rect(i * 10, raindrops[i], 5, 10);
    raindrops[i] += 2
  }
}

Educator notes

If the students make the array longer (e.g. from 4 elements to 100 elements), they always have to change the condition in the for-loop too. Otherwise, the for-loop won’t go through the whole array.

It’s also possible to get the length of the array with the variable “array.length” (e.g. raindrops.length). This is a variable that keeps track of the number of the elements of the array automatically. See the code example below.

for (int i = 0; i < raindrops.length; i += 1){
  // Statements inside the for-loop
}

The benefit is that if you want to create a longer array, you won’t need to change the condition in every for-loop - the variable keeps track of the length automatically.


3D Perspective

Transcript

Hi! Rainstorms don't look like this, do they? The drops have the same starting location and the same speed so they fall in a row. First, let's change the speed at which each raindrop falls. In a real rainstorm all the drops have the same speed. but the drops that are far away look like they are falling more slowly. So varying speeds will create a nice 3D-perspective! So I will create another array called "dropSpeeds". it should be the same size as the raindrops-array. But now all the numbers in this array are zeros and that's not what we want. I can go through the whole array and set values to all these units. I'll do that in the setup-part because I only want to set the values once. So how to add a bit different speed values to all the raindrops? Let's not forget our old friend, the random command. Now each unit of the array will be a random decimal number between two and five. There's an error! That's because the random-command returns a decimal number like 3.52 or 2.5 but I've defined a list that can only have integers. I can fix this by changing the datatype of the array to float. float means decimal numbers in programming. You can store decimal numbers like 1.5 or 3.5 to a float-variable but you can also store a whole number like one there - so it's actually safer to use floats! I'll change the datatype of the other array to float too. Now there are no errors! Then instead of increasing the y-locations always by two I want to move them using those speed values. Now let's see how this looks. Now there's some natural variation! But there still aren't any new raindrops. I can check if a raindrop has moved out of the canvas with an if-structure. If a raindrop is out of sight, I'll set the y-location back to zero. What does it look like now? The atmosphere is nice after a while. You could still adjust the speed of the raindrops and the sizes of the rectangles. And it would be great if the canvas would be full of raindrops already when the program starts. You created a hundred of shapes and similar code can be used for all kinds of projects where you need a lot of shapes. If you look at the code inside the for- loop you'll notice it's very familiar from the earlier chapters. A shape moves across the canvas and if it gets out of sight the code detects this and returns the shape back to the top again. The only difference to your earlier programs is that we used arrays and for-loops this time. With them you can move and track a hundred shapes without any trouble. Whenever you want to program many simultaneous events on the canvas you will need arrays and for-loops in one form or another. If they feel a bit difficult still, don't worry. You will learn to master arrays and for-loops by practicing!

Do this

Finalize the code by following the instructions in the video. The commented version of the code is given below.

  • Use your own colors and draw something other than rectangles, if you like.
  • Choose your own range of speeds for the moving shapes.
  • Think of what the shapes could represent. Give your code a descriptive name and save it (File > Save As).
  • If you want, you can develop your code further in the next section where you create the final project of this module.
float raindrops[] = new float[100];
// Array dropSpeeds will include the individual speeds of raindrops.
// At first, all the elements are zero.
float dropSpeeds[] = new float[100];

void setup() {
  size(500, 500);
  // Go through the dropSpeeds-array and save a random number between 2 and 5 to each element.
  // Choose your own range for the speeds.
  for (int i = 0; i < 100; i += 1) {
    dropSpeeds[i] = random(2, 5);
  }
}

void draw() {
  fill(150);
  rect(0, 0, width, height);
  fill(0, 0, 255);
  // Variable i goes from 0 to 100 and increases by one every round.
  for (int i = 0; i < 100; i += 1) {
    // Draw the raindrop with the rect-command. 
    // Horizontal location is i * 5, vertical location is raindrops[i], width is 5 and height is 10.
    rect(i * 5, raindrops[i], 5, 10);
    // Increase the vertical location of the raindrop (raindrops[i]) by its' speed (dropSpeeds[i])
    raindrops[i] += dropSpeeds[i];
    // If the raindrop moves across the bottom end of the canvas, it appears from the top again.
    if (raindrops[i] > height) {
      raindrops[i] = 0;
    }
  }
}


See the setup-method of the code above. What kind of values are stored to dropSpeeds-array?

Educator notes

Activity: Observe a real rainstorm together with the students. Does it look like all the raindrops have the same speed or are some raindrops moving faster than others?

Activity: Observe your surroundings. What other phenomena besides the rainstorm could you illustrate with the programming tools of this topic? You can have a lesson where you take the final code from this tab as a starting point and start tinkering it to create bubbles, clouds, congested traffic or whatever other ideas the student may have! It’s possible to create totally different atmospheres by changing the shape, size, and speed of the shapes. You can change the size of the canvas and the amount of the shapes on the canvas too.