Adding Images

Image as a Background

Transcript

Until now you have illustrated creatures leaves of autumn black holes UFOs and many other things with basic geometric shapes like lines, ellipses and rectangles. The benefit of drawing these shapes is that it's easy to change their colors and sizes and to move them you just have to change the arguments of a command either directly or by using a variable. The downside, on the other hand, is that it's hard and slow to draw complex things with shapes. For example, what if you would like to draw a realistic looking forest? You could add a blue sky as the background. And start drawing brown lines to illustrate the trees. And the trees deserve green tops as well. So, that was a lot of work and it didn't make much of a forest yet. Sometimes it's easier to just add a ready-made image to Processing. That's a good option especially if you want to have a background that stays still and doesn't react to anything. First you need to find the image you're looking for. You can take it with your camera or find one from the internet. If you're using Google remember that you need permission to use other people's images. So my friend took this nice image of a forest in Finland. I'm going to use it in this example. And how could I import this image into Processing? First I need to save my sketch so "File" and "Save as". And I'm gonna call this one "magic_forest". Okay, save. and then I'm gonna go to "Sketch" and "Add file". So I have my image on the desktop so there is "forest" and I click open. So what happened now is the Processing copied the image to the folder of the sketch. If I go to my sketchbook and find this magic_forest sketch I can see that there is this data folder and there is the picture of my 
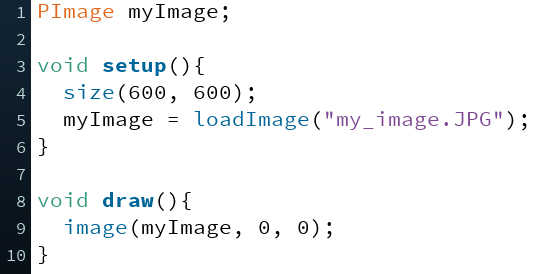
forest inside. Okay, so back to Processing. To load the image to my sketch I first create a PImage-object called "forest". "PImage forest" is similar to the command "int ballX" . The datatype of forest is PImage which just means it's an image and the data type of ballX is integer. The difference is that images include much more data than just integer values. Images are really objects in Processing whereas integers are just whole numbers. You get to program more with objects later on. So then I tell the computer that this image is the one that I just added to the folder. It's important to add the file extension to the name as well. If you are using Windows, you can see it by clicking the file with the mouse right -button and selecting "Properties". So here we can see that the type of the file is jpg. Okay, let's run the code. Uh-huh, okay it says "The file "forst.jpg" is missing or inaccessible". So it didn't find the image and that's because I made a typo here in the name of the image so let's try again I'm gonna correct it and let's press run again. Okay, there's no errors but nothing happens either. That's because we haven't told the computer to actually draw the image. I'll add one more command and this is in the draw-part. So image and forest and then zero and zero. The forest is now our image and the two zeros define the location of the upper-left corner of the image just like when drawing like rectangles. I run the code. Okay the image appeared there but there's a problem. The image is way too big - we need to change the size somehow. But more about that in the next video. First add your own image to Processing.

Do this

Write the program in the video (below).

Add your own image to Processing like in the video.

You can take the image yourself and then send it to your computer by email, for example. You can also download the image from the internet. 

You can use resize-command to change the size of the image to fit your canvas. We will have more on that in the next video!


If you want to add an image to you Processing-program, where the image must be?

Educator notes

An image will make a nice static background to your sketch. Once added, It’s possible to further edit your image in Processing. Given that an image is just a series of uniquely colored pixels, Processing can help you tinker with those colors. Whether you want to learn the basics of image processing or do more advanced things, you can find interesting examples in Processing IDE.

For the basics, check File -> Examples -> Basics -> Image For the advanced stuff, check File -> Examples -> Topics -> Image Processing


Scaling the Image

Transcript

Hi, let's scale the image we added to Processing previously. It's easy to resize an image with a command called resize. So let's writet here into the setup: forest... So I used a new kind of expression here. Previously you have used variables as parameters of a command but here "forest" is not a parameter of a command anymore. It''s written before the command and separated with a dot. I can use this kind of an expression because forest is not a variable but an object of the PImage -class. As I said before objects contain much more data than just a simple variable. For example an image has thousands of pixels that each have unique colors. Let's run the program now and see what happens. Okay, that's better but there is now a problem. My original image wasn't a square and now it is. It means the image has lost its original aspect ratio. That's why it doesn't really look right. So what if we wanted to keep the original aspect ratio of the image? I need to create a couple of new integer variables for this and I can create them inside the setup-method because we only need them to scale the image once. So let's see, let's add it here after loading the image. So int... Okay, this expression "forest.width" gives the width of my image so now newForestWidth is the same as the width of the image and newForestHeight is the same as the height of my image. So now it's really easy to scale the image and make it for example half of the original size. I just write here: "half times forest .width". And here: "half times forest.height." And let's run the code. Uh-huh? Okay, so Processing gave us an error and it says "Cannot convert from float to int". So that's because the results of these multiplications can be decimal values but here we have precisely told the computer that these are going to be integers so whole numbers. Let's say if for example the width of the image is 101 pixels, then half times that is 50.5 so we have a decimal number instead of an integer and when we tell the computer that this is an integer it really doesn't like to get something else. We can fix this error by using a command called "int" and that rounds a decimal number downwards to the nearest integer so for example if we have 50.5 it will just become 50. And we do it so that we write here "int" and then place this in the parentheses. Okay and now... Now tiese variables contain the scaled width and height of the image and I can use these variables inside the resize-command so let's do that. Okay, let's run the code. Okay it's still pretty huge image so let's scale it down a bit more let's say something like 0.2 of the original instead of 0.5. Okay so now we have the full image there but the size of the canvas is still wrong. We are going to complete the scaling in the next video.

Do this

Copy the code in the video (below).

Scale your image to a convenient size.

EXTRA:

If you are used to photo editing with other softwares, you can resize the image before adding it to Processing.

PImage myImage;

void setup(){
  size(600, 600);
  myImage = loadImage("my_image.JPG");
  int newImageWidth = int(0.2 * myImage.width);
  int newImageHeight = int(0.2 * myImage.height);
  myImage.resize(newImageWidth, newImageHeight);
}

void draw(){
  image(myImage, 0, 0);
}

int newForestWidth = 0.5 * forest.width;
What is wrong with the expression above?

Educator notes

Programming isn’t the most convenient way to resize images. If you have another image editing software or drawing program installed on your computer we recommend that you resize the images there before adding them to Processing!

The Right Size

Transcript

Let's get back to working with the background image. Previously we ended up with this situation where the canvas is bigger than the image. So why don't we just use these variables newForestWidth and newForestHeight inside the size- command. Let's try what happens. Okay, so we got an error here so we can't do this because size-command is a little picky: it's not possible to use variables inside it. And even if it was possible to use variables inside it we declare these values to the variables after the size command. So remember: a computer reads the code top-down so at this point it doesn't know about these variables yet. So can we move the size command after these scaling commands? Well that's not possible either because size is special in this way too. It always needs to be the first command in the setup. So let's change it back. So what a puzzling situation. If only we knew the size of the scaled image beforehand then we could use those values to make the canvas the same size as the image. Luckily there is a way for us to do this. We can print the variables with the command "println". and this is how it works. I write println here and then parentheses and in there what we want to print. So in this case we want to print the variables. Okay so I run the code and I should get the values printed down here to the console. Let's see. Okay so now I know that the width of the image is 489 and the height is 652. So now that we know them it's easy to write them to the size-command directly. Okay let's run the program and there it is! Now the image and the canvas are of the same size.

Do this
Follow the instructions in the video and make the canvas and your image the same size.

An Arrow or a Creature?

Transcript

A background-image is good for generating the right atmosphere but you can use images for other purposes too. Let's add a smaller image that follows your mouse. It's like a creature that you can move on your canvas. First we'll need the actual image. You can draw the creature yourself or download it from the internet. You can find some links to pictures of funny creatures that are ok to use below this video. I have chosen this freely available creature drawn by artist Kati Hyyppä. So you can see it there. And the file format of this image is... let's see... "PNG". And as you can see, this image isn't shaped like rectangle. It has a transparent background and that's a benefit you'll see soon why. So back in Processing, let's add this image to the data folder of my sketch. So "Sketch" and "Add file" and there we go. Then I'll create a PImage object and name it "creature" so right here in the beginning... like that. And now I load the image to this PImage object and remember to add the file extension to the name! So I'm gonna do it right here under the forest... ...dot png, like that. Then finally, I'm gonna draw the creature in the beginning of the draw. Like that. Let's hit run. Okay now it's there but it's quite a gigantic creature I would say. But as you can see the transparent background is a benefit - the image is shaped like this creature and not like a rectangle. So now I want to make this image much smaller first. So let's resize it in the same way as before. Let's put it here so again... and remember to use the int-command there. Okay and now we still need to use the resize. Okay, let's see. Better but yes, still too large. So let's make it something like 0.1 so ten times smaller. Ok, that's perfect! So how can I make the creature follow my mouse? Well I just need to add the mouseX and mouseY as the location of the image. So here in draw. Yeah that's more like it. Okay so now there's kind of two cursor images here, like the original one, this arrow, and the creature. I can remove the original cursor from the sketch with one new command. Let's go to the end of setup and write "noCursor". Okay so now the creature is my new cursor but just on the canvas. If I go away from there you can still see the mouse.

Do this

Add a creature-image to your sketch. Example code from the video is below.

You can download the creature-image from the web or draw it with your computer. The image in the video has been downloaded from Creature Party -website. It was made by artist Kati Hyyppä under the "Be Nice License" (BNL 1.0)

Develop the code so that creature follows your mouse. Use the noCursor-command in the setup to not display your normal cursor on the canvas.


PImage myImage;
PImage creature;

void setup(){
  size(489, 652);
  myImage = loadImage("my_image.JPG");
  creature = loadImage("creature.PNG");
  int newImageWidth = int(0.2 * myImage.width);
  int newImageHeight = int(0.2 * myImage.height);
  int newCreatureWidth = int(0.1 * creature.width);
  int newCreatureHeight = int(0.1 * creature.height);
  creature.resize(newCreatureWidth, newCreatureHeight);
  myImage.resize(newImageWidth, newImageHeight);
  // Use the noCursor-command to not display your normal cursor on the canvas.
}

void draw(){
  image(myImage, 0, 0);
  // Make the creature follow your mouse
  image(creature, 0, 0);
}

What is the benefit of using PNG-images instead of JPG-images?

Educator notes

Activity: Why don’t you draw your own creatures in the class, either by hand or with a drawing software? It’s beneficial if students learn to draw and edit images in the computer-environment and use these skills on this Art Programming track.