Clicking and Pressing

Click the Mouse

Transcript

Hi! Let’s make the crayon even better! Here’s a familiar example. Okay, I’ve made the background black with this big rectangle here in the setup -part and now I want to draw stars to the canvas with yellow. Drawing stars is a bit difficult because I'm not very good at that but also because the crayon never stops drawing. And it would be kind of great if I could lift the pen after I'm done with one star, and then move the cursor here and then draw another star again. And yeah, with Processing you can do that. There’s a system variable called mousePressed that can help. Let’s see first what kind of values I can get out of mousePressed! So I'm gonna write here the println-command again. Okay, so it is just going to print the values of mousePressed down here into the console. Let's run the code. Okay, so it prints “false” over and over again. But now, if I press the mouse... It prints “true” when I keep my mouse pressed. Now i'm going to release my mouse... and it's false again. MousePressed is a special variable, it's like a yes/no question you ask at a certain point in the program. If the mouse is pressed, the answer is true. If not, the answer is false. And that's it, there's no other values that are possible. Fun fact: these kind of variables are called "boolean". The value of boolean-variables is always either 
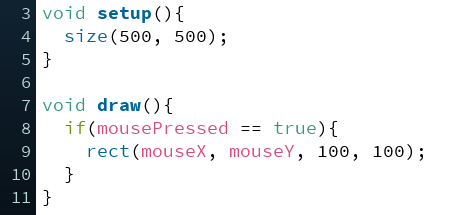
true or false. But what can we do with this variable? So I'm gonna make an if-structure here. So let's say I want to check if the mouse is pressed and only if it is pressed, I want to draw the line. Okay, so let's try the code. Okay, now we see it says "false" here all the time and nothing happens here, but let's click the mouse. Okay now you can see it says "true" there and I'm drawing. If I let go of the mouse, It's not drawing anything again. So now I can actually start drawing some stars. You may have noticed there's this really strange symbol, these double equals things (==). And previously in the if-statements you've used bigger than or smaller than -symbols. And in programming these are called operators. This double equals -symbol is also an operator and it checks if the value equals some other value. It’s different from the equals - symbol which you use to assign a value to a variable. So remember to use double equals (==) whenever you are comparing something and one equals-sign (=) only when you are setting the value of a variable. Okay, time to practice!

Do this
Answer the multiple choice questions below.

Which of the following in NOT a possible value for a boolean variable?

What does the program above do

Educator notes

mousePressed is a boolean variable that can be used to track things that are either true or false. It’s possible to place a boolean variable into if-test directly without the double equals -sign (==), like:

if(mousePressed){
  line(pmouseX, pmouseY, mouseX, mouseY);
}

Students are taught to use the double equals -sign because it’s easier to understand the relation to the tests with integer-variables in this way.


Press the Keys

Transcript

It's nice to control the projects with the mouse but the mouse has only two buttons. What if you want to add more functions, color selection for example? you need one button for yellow another one for blue a third one for red and so on. So let's see how you can use the keyboard in the sketches. The idea is very similar to using a mouse. I'll use the keyPressed-variable instead of mousePressed. This time let's print the variable to the message area like before. Okay so let's run our code. This works as expected. Now we see that the value here is false and it becomes true if I press any key on the keyboard. And if I hold it down it stays true and false if not. So, let's add a new if-structure. I want to use the keyPressed-function to change the color. So I'm gonna put the stroke inside this if. So first we want to check if keyPressed, and remember double equals, true. And let's just put our stroke inside there. Okay. And I'm gonna make it random every time the key is pressed so something like this so the color will change randomly. But only when I press the key. Okay. Let's see. Now I don't see anything. Let's press a key. Okay, now there's blue. Let's press again. Uh-huh a different kind of blue again. Let's let's try and change the weight of the line as well so in addition to the stroke I'm also gonna add here strokeWeight and let's make that a random value between one and thirty and run it again. I press a button Okay, yeah now we get different kind of lines here and what happens if I just hold it down? Let's see. Okay! So now the line weight and the colors are changing randomly all the time. What could you draw with this kind of magic crayon? Try it yourself!

Do this

Copy the program in the video from below.

Choose your own ranges for drawing color and stroke weight.

Give your creation a name and save it (File -> Save As)

void setup() {
  size(500, 500);
  fill(0);
  rect(0, 0, 500, 500);
  strokeWeight(5);
}

void draw() {
  if (keyPressed == true) {
    // The program selects a new random color and stroke weight when any key is pressed.
    // Choose your own color-ranges (Tools > Color Selector can help)
    stroke(random(0, 255), random(0, 255), random(0, 255));
    // Choose your own range for stroke weight. Try big values too (e.g. 150).
    strokeWeight(random(1, 30));
  }
  if (mousePressed == true) {
    line(pmouseX, pmouseY, mouseX, mouseY);
  }
  println(mousePressed);
}


Educator notes

Some students might want to know how to check if some specific key has been pressed, like ENTER, UP or letter 'A' for example. It's possible to achieve this by using the key-variable or the  keyCode-variable in Processing. The key-variable works best with the letters and numbers of the keyboard while the keyCode works best with keys like SHIFT, UP and DOWN. Try the following example, where Processing prints the key and the keyCode of the pressed key. Press different keys and see what is printed to the console!

    void setup() {
    }

    void draw(){
      if(keyPressed == true){
        println("Key:  " + key);
        println("keyCode: "+ keyCode);
      }
    }

When you know the key or keyCode of the button, you can refer to it in the if-statement. The following code draws an ellipse to the mouse-location when the letter 'v' is pressed (at least on most keyboards). keyCodes work without quotation marks, but you have to use them when referring to keys (eg. 'v').

    void setup() {
    }

    void draw(){
      if(keyPressed == true){
        if(key == 'v'){
          ellipse(mouseX, mouseY, 100, 100);
        }
      }
    }

The Color Palette

Transcript

Hi! If you have ever used a drawing application before you've noticed some features they all have. You press the mouse to draw a line and you can make the line thicker and for example change the color. You have coded many of these features in your program already. But in most applications there's buttons or menus that you can select with your mouse. For example in this program I can choose the color by clicking here. Next I'll show you how to add this kind of a color palette to Processing. First I have to create those buttons. I begin by adding two rectangle-shaped buttons to the canvas. The first one will be red and I will put it in the upper left corner. So I'll place them inside the setup because I only need to do this once. And the second one, I will make it blue. I'll put it just below the red button. Okay let's run the code. Okay, the buttons are now there but they don't react to anything. I want the color of my crayon to change to the color of the button if I click it. First I need to check if the mouse is pressed. You already know how to do this. I also have to check where the mouse was pressed. There's three alternatives. I'm either pressing the red or blue button to change the color or I'm pressing the mouse to draw to the canvas. So there's now two different tests. The first one checks if the x-coordinate of the mouse is below 100 and the second one checks if the y-coordinate is below 100 too. but what is this new symbol here? These two ampersands (&&) tell the computer that both of the conditions have to be true. In human language you would read: "If mouseX is smaller than 100 and mouseY is smaller than 100, then do whatever is inside the if-clause". So if both of these are true the mouse has been clicked on the red button and I change the color of the stroke to red. At this point of the program the computer has checked if the mouse is on the red button. After that I want to check if it's on the blue button. I'll just add a similar-looking if-structure here So I wrote here "else if". It means that the computer checks this one only if the previous if statement is not true. So, if the mouse is not on the red button I check if it's on the blue button so let's run the program and see how it's working. Ok so nothing seems to happen even if I click my mouse. Why is that? Oh wait, we haven't told the computer to actually draw anything So we need one more condition here. If the mouse is neither on the red or on the blue button I just draw things on my canvas normally. So I can write here "else" and this part is executed whenever none of the previous conditions are true. And this will be the familiar drawing. Okay, now let's run the code again. Okay so now I'm drawing like this, let's click the red. Oh yes and I have the red color and the blue color. Okay so next try adding one more button that changes the crayon to green.

Do this

Copy the code in the video from below.

In the setup, draw a green button below the red- and blue buttons.

In the draw, add an else if -statement that changes the color to green if mouse is pressed on the green button.

void setup() {
  size(500, 500);
  strokeWeight(5);
  fill(255, 0, 0);
  rect(0, 0, 100, 100);
  fill(0, 0, 255);
  rect(0, 100, 100, 100);
  // Add a green button below the red and blue buttons
}

void draw(){
  if(mousePressed == true){
    if(mouseX < 100 && mouseY < 100){
      stroke(255, 0, 0);
    }
    else if(mouseX < 100 && mouseY < 200){
     stroke(0, 0, 255);
    }
    // Add here an else if statement that checks if the mouse has been pressed on the green button.
    // If the mouse has been pressed on the green button, change the color to green.
   else{
      line(pmouseX, pmouseY, mouseX, mouseY);
    }
  }
}


Educator notes

Conditional statements (if, else if and else) can sometimes make your brain hurt but don’t worry, it gets clearer with practice! To get the hang of it, see the code-example below where the green button is added to the program. The comments explain the code.

void setup() {
  size(500, 500);
  strokeWeight(5);
  fill(255, 0, 0);
  rect(0, 0, 100, 100);
  fill(0, 0, 255);
  rect(0, 100, 100, 100);
  // The green button
  fill(0, 255, 0);
  rect(0, 200, 100, 100);
}

void draw(){
  // First, the computer checks if the mouse has been pressed. 
  // The rest of the conditional statements are 'nested' inside this first if-statement, so the computer checks them only if mouse is pressed.
  // If the mouse is not pressed, the program doesn't do anything!
  if(mousePressed == true){
    // If the mouse is on the red button, change the color of the stroke to red.
    if(mouseX < 100 && mouseY < 100){
      stroke(255, 0, 0);
    }
    // If the mouse is not on the red button, the computer checks if it is on the blue button. 
    // If it is, it changes the color of the stroke to blue.
    else if(mouseX < 100 && mouseY < 200){
     stroke(0, 0, 255);
    }
    // If the mouse is not on the red or blue buttons, the computer checks if it is on the green button.
    // If it is, it changes the color of the stroke to green.
    else if(mouseX < 100 && mouseY < 300){
      stroke(0, 255, 0);
    }
    // If the mouse is not on any of the buttons, the program draws the line.
    else{
      line(pmouseX, pmouseY, mouseX, mouseY);
    }
  }
}