Your Favourite Crayon

Educator notes

Educator Notes

Transcript

Hi, I'm Antti from Mehackit. In the last chapter you learned to create fascinating moving visuals. You just wrote the code of the program, pressed run and the computer took care of the rest. But that's not how applications usually work Normally you are able to use the program after launching it by pressing the keys of your keyboard or mouse, for example. Computer programs are quite dull if they're just screensavers and this chapter is about making them interactive. First students learn to move objects on the canvas with their mouse. Then they build a classic drawing program where the computer draws a line where you put the mouse. Students also learn to see the values of variables in real time with the println-command. This makes it much easier to understand what the computer is doing and why some things don't work as expected. Next, students make the computer change the colors if the keys of the keyboard or the mouse are pressed. The concept of system variables is introduced They are variables that automatically keep track of the locations of the mouse for example. Some of the system variables are of a new data type: "boolean" Boolean-variables are used for keeping track of things that can be just true or false. Like if a key is down or not down - there is no other option. One way of connecting Processing with everyday life is importing your own images to Processing. It's possible to import your photos or download images from the web. Just remind the students that they can't use someone else's images unless they have been published under a proper Creative Commons -license. The students are also introduced very basic game logic. In the project of this chapter students are encouraged to develop their drawing program further but if they want they can also continue their project from the previous chapter or even add some game-like features to their project. Game programming might catch a lot of attention but developing a more complex game requires a new set of skills that are taught more in the projects after this basics-module. Enjoy your lessons and remember to check those Educator Notes.

Length of the chapter: 1,5 - 3h

  • Adjust the length of the chapter according to the time you have at hand.
  • There are more detailed lesson plans below.

Learning objectives of this chapter

Students learn…

  • … the basics of interacting with Processing programs
  • … to make shapes follow their mouse.
  • …to build a classical drawing program where you can draw a line with the mouse.
  • … to change the colors of the program by pressing the mouse or keyboard buttons.
  • … to create interactive buttons on the canvas.
  • … to import their own images to Processing and scale them.
  • … to build a basic game.
  • … to build their own drawing studio in the exercise of this chapter.

Slides and Lesson Plans

You can use the slides below to introduce the third chapter to the students. See also the lesson plans below the slides!


Plan 1 - Structured Lessons (110-150 min)

Time to CompleteActivity
10 minSCRUM routine: Students explain to others: 1) what was the last thing they did on the previous lesson and 2) if they had any challenges they need help with. If students are shy to speak when others are listening, you can go and talk with them individually later on.

It doesn't matter if some students are still completing the tasks of the second chapter. You can help those students after introducing the third chapter to everyone.
15 minIntroduce the third chapter with the slides above. 
25-45 minStudents start the third chapter alone or in pairs and go through the topics Your favourite crayon and Clicking and Pressing. Ask students to speak out if they have any challenges.

Go around in the classroom while the students are working and discuss briefly with each student. Talk especially with those who have had challenges or seem to lack motivation. Make sure that every student has some kind of meaningful goal for this lesson. 
10 min

Ask the students if they have had any challenges so far. One of the more challenging things in this chapter is the tab The Color Palette in the topic Clicking and Pressing. if-else -statements might need more detailed explaining.

15-30 minStudents move on to the topic Adding Images. Ask students to raise their hand if they have challenges.

Students are advised to use an image of their choosing as the background of their sketch. Students might need help in getting images from the camera of their phone to the computer or downloading an image from the web.

There's an extra topic in this chapter called Make It A Game. At least the faster students can move on to that one too.
15 minReflection discussion: What has been most interesting? Do you have ideas of what to express with the new programming tools? 

Introduction to the The Drawing Studio -exercise
- Show an example result from Open Processing or show something you have coded yourself
- Give a time-limit: 30 minutes!
30 min

Students develop their own Drawing Studio and submit the code.

5 min

You can end the lesson (or start the next) by going through a couple of Drawing Studios the students have made, if they are willing to show them. 

Plan 2 - Freely flowing lessons (110-150 min)

Time to CompleteActivity

10 min

<SCRUM routine: Students explain to others: 1) what was the last thing they did on the previous lesson and 2) if they had any challenges they need help with. If students are shy to speak when others are listening, you can go and talk with them individually later on. It doesn't matter if some students are still completing the tasks of the first chapter. You can help those students after introducing the second chapter to everyone.

5 min

Set a goal for the next lessons: complete the third chapter. Show the Drawing Studio -exercise of the chapter to the students with a projector.

Ask the students to start from the topic Your Favourite Crayon and then continue forward. Ask the students to speak out if they have a any questions.

60-90 min

Go around in the classroom while the students are working and discuss briefly with each student. Talk especially with those who have had challenges or seem to lack motivation. Make sure that every student has some kind of meaningful goal for the lesson. 

There's an extra topic in this chapter called Make It A Game. At least the faster students can create a simple game in that topic.

10 min

Reflection discussion: What has been most interesting? Do you have ideas of what to express with the new programming tools? 

Introduce  The Drawing Studio -exercise. If some students have started or completed it already, it doesn't matter.

- Show an example result from Open Processing or show something you have coded yourself.
- Give a time-limit: 30 minutes!

30 min

Students develop their own Drawing Studio and submit the code.

5 min

You can end the lesson (or start the next) by going through a couple of Drawing Studios the students have made, if they are willing to show them. 


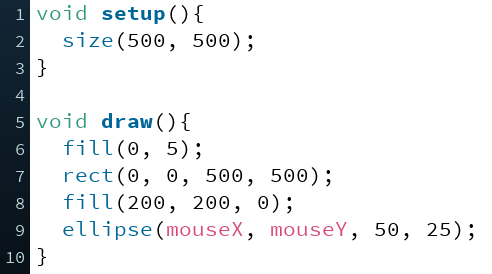
Chasing the Mouse


Do this

Write the code in the video (below). 

Replace the ellipse with something cool that follows your mouse! Below is an example but develop your own idea.

Educator notes

In 1968, Douglas Engelbart introduced the first mouse  and since then, the mouse has become an essential tool for using the computer. It's hard to imagine using a traditional computer without a mouse. It's easy for us to track the movement and clicks of mouse within the Processing-environment.

Besides your keyboard and mouse, there are many other tools that can be used with computers, like touch screens, voice recognition software, and even movement tracking via a camera. in Processing, it's easy to bring in data from these tools—even your computer's microphone or web camera. These input devices are explored more in the projects following the Basics-module. All in all, interactivity is one of the main benefits of using digital tools in art, as can be seen in modern arts museums all over the world!

Once the students are familiar with how to use mouseX and mouseY variables, it will be easy for them to use it in their previous creations. In addition to using them as the locations of shapes, it's also possible to use them for changing color or color transparency by placing them inside the fill or stroke -commands. If mouseX and mouseY exceed 255, it is recommended that you use the map-command to adjust the numbers to proper ranges.


The Crayon

Transcript

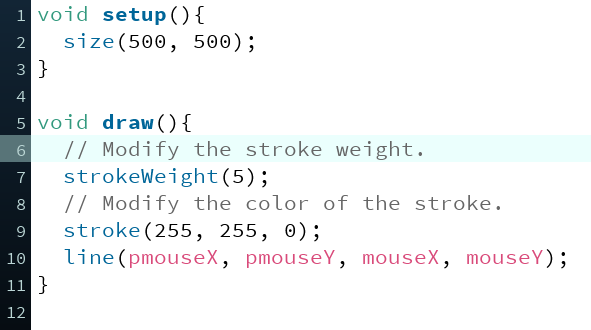
Let's continue with this program which draws a shape to the location of your mouse. So how about you code a pen which draws a line as you move the cursor on the screen? Let's use the most simple drawing command in Processing: point. It needs only two parameters: the x- and y-coordinate of the point on the canvas. Okay now it should draw the point to the location of the mouse. As I move the cursor on the canvas the computer draws something... but the line is very light and it just consists of these points that can be quite far apart. So how could I fix this? Remember that you can change the weight of a line with strokeWeight- command. This command has an effect on points too. So let's try that. I'll change stroke weight to something like five. And let's run it. Okay, now the line isn't so light anymore but there are still these long gaps between the points. If I move the cursor very fast I'm able to move it quite a bit before the computer draws the next point. So how do I make this a continuous line instead of a series of points? I'll need to draw lines to these empty spaces here so let's use the familiar command line! There's two more system variables that can help us: pmouseX and pmouseY keep track of the location of the mouse on the previous round of draw. I'll write these two, pmouseX and pmouseY as the starting place of the line and mouseX and mouseY, the current position of the mouse, as the ending point of the line. Okay, now the gaps disappeared! And you can change the color of the line with a stroke-command I'm gonna make mine yellow so... stroke here. Okay and run. Use your favorite color and draw something with your new painting tool!

Do this

Write the example in the video (below). Choose your favourite color and set a new stroke weight.


What is the function of system variables pmouseX and pmouseY?
What command draws a steady line that follows the mouse?

Educator notes

We all have our favourite crayon, and students will start developing a digital version of it in this part. It’s a good start to draw points to the mouse-location because it shows the students how the computer executes the code. If you move the cursor quickly you’re able to move it quite far before the computer executes the draw-loop again and draws the next point.

What’s Going on with the Code?

Transcript

Every programmer knows the situation when the program just doesn't work the way you think it should. If you for example mistype a programming command, you'll get an error. If you forget the symbol like a curly bracket, you also get an error. But it can be even more frustrating if there are no errors but the program still doesn't do what you expect. So I have a familiar-looking program here and it moves an ellipse across the screen because the x- and y- coordinates are increasing. And I have a new thing here: I control the width and the height of the ellipse with the mouse. So moving my mouse should change the size of the shape. Let's run the program. Okay I see nothing. So what could be the problem here? I'm going to show you a handy tool for solving problems like this. I'll add a command called println short for print line and I will put the variable ballX inside the parentheses. Okay, let's run the program. Okay so you see that some numbers start to appear here in the lower panel of the Processing IDE and this is the message area where you have previously seen all the error messages. And everything you print using the println-command will appear here. So I placed ballX inside the parentheses so these numbers are the values of that variable. Okay so you may already know what's wrong with my program. In the beginning the value of ballX is already 500 so the ball moves outside the canvas immediately because the width of the canvas is also 500. Let's change these to start from zero and try again. Okay, yeah now the example works! the size of the ball changes when I move my mouse and I can see the ball. And I can use any other variable inside the println-command too. Let's try for example our mouseX. Okay let's run the program. And now it prints the x-coordinate of the mouse so zero is there and 500 almost is there. Okay so let's make this message a bit more informative. Instead of just this mouseX I'm gonna write some text here and I have to write with quotes. "mouseX is now" before the variable name and then I have to use the plus-sign and that basically just means that add the variable to the end of this text so let's see. Okay, now it looks nice and informative.

Do this

Use the println-command in the draw-method to print the value of a variable to the Console. Below there’s three examples.

println(ballX); println(mouseX); println(mouseY);


What does the command println(ballX); do?
What does the command ellipse(250, 250, mouseX, mouseY); draw?>

Educator notes

Printing things to the console is a crucial part of programming. It helps you to get information from your program to help solve challenging situations. In programming, this is called  debugging. Sometimes it is handy to print things to several columns. If, for example, you want to see the values of three variables at the same time, you could use the following code where var1, var2 and var3 represent some variables.

println("Variable 1: " + var1 + "  |  " + "Variable 2: " + var2 + "  |  " + "Variable 3: " +   var3 );

It's possible to combine the Strings and variables like this with the plus sign.